Who on earth uses the Google Elevation API?
How the Google Elevation API works, how much it costs, and when it's worth using (or not) - with real world examples from logistics and fitness.

The Google Elevation API gives you elevation data for any point or path on earth. It may seem niche (and it is), but it has applications in logistics, fitness and activity tracking. In this blog post, I’ll explain how the Google Elevation API works, why it’s useful, discuss pricing and provide some real world use cases. I’ll also walk you through building a simple app (frontend / backend) that lets you get the elevation of any point on Earth.
What is the Google Elevation API?
The Google Elevation API is a web service that returns the elevation (measured from mean sea level) for any given latitude and longitude. If you've used the Google Maps app for bike routing, you’ve probably seen the Elevation API in action.

Open the Google Maps app, enter your starting point and destination, then select Bicycle as your travel mode. You'll see an elevation profile for the route, including total elevation gain and loss, along with a warning if the route includes steep hills.
Why is the Google Elevation API useful?
Modern smartphones are packed with sensors. GPS can pinpoint your location, motion sensors can detect whether you're walking, running, or climbing stairs, and the camera can capture high resolution photos, even in low light. What smartphones lack is a reliable way to measure absolute elevation - height above mean sea level. While many modern phones include digital barometers, these sensors can only detect relative changes in elevation, such as floors climbed, rather than true elevation. That’s where the Google Elevation API comes in. It lets you determine elevation using GPS coordinates from your phone.
How is Elevation data collected?
Traditionally, you would measure elevation using barometric altimeters (lower pressure = higher elevation) or aerial photogrammetry, which uses two overlapping aerial photographs taken from slightly different angles to measure parallax - the apparent shift in position of an object when viewed from slightly different angles. Using the known geometry of the camera positions, image scale, and parallax, the absolute elevation of each feature can be computed via triangulation.
Both methods are slow and expensive. Yet because elevation data has important military and civilian uses, it was still collected. The result was data that was sparse, inconsistent, stored in different formats, and often restricted due to political sensitivity.
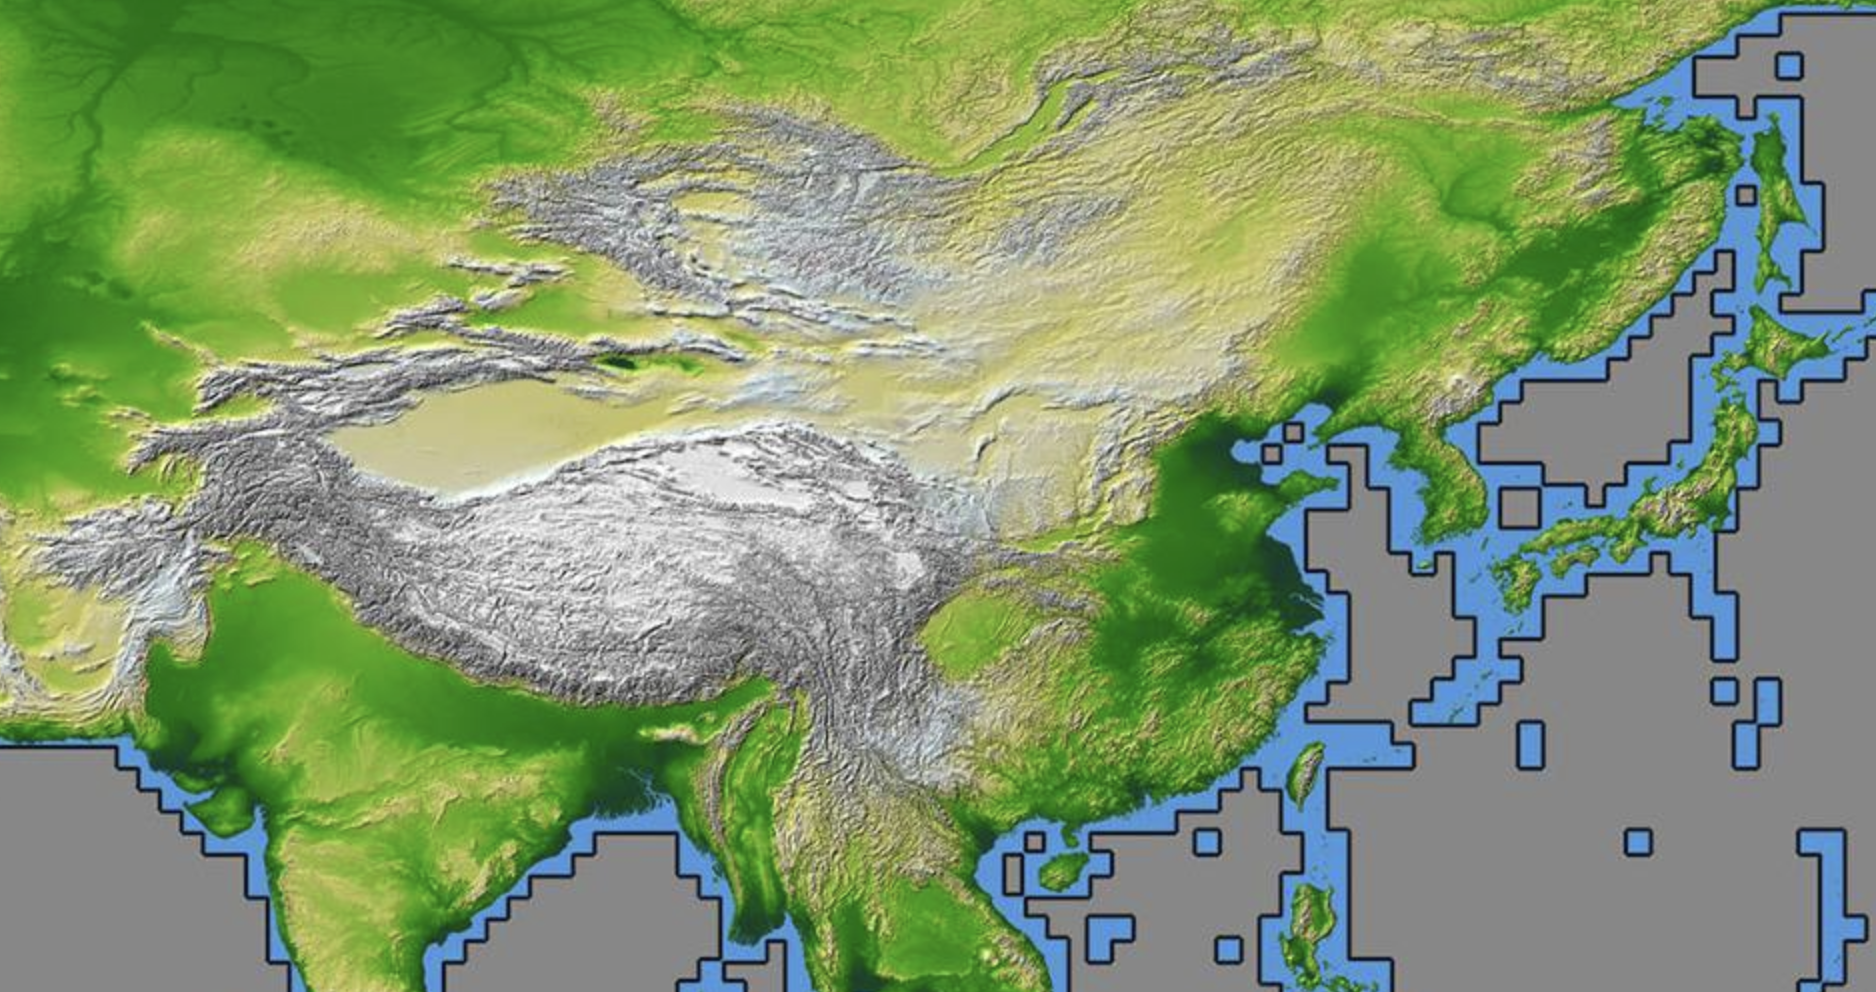
All that changed over the course of 11 days in February 2000 when NASA launched the Shuttle Radar Topography Mission (SRTM). The SRTM payload (two radar antennas) flew aboard the Space Shuttle Endeavour and collected topographic data for more than 80% of Earth's land surfaces, creating the first ever consistent, high resolution, global map of Earth's land elevation. This map was made publicly available as a GeoTIFF file and it was a huge turning point for GIS (Geographic Information Systems) and open source mapping. SRTM basically democratized global elevation data - making accurate, high resolution topography available to anyone, anywhere, for free. Its the reason why apps like Strava, FATMAP, and AllTrails can generate elevation profiles and why web based maps (like Google Maps terrain view) show mountains and hills.
How does the Google Elevation API work?
Google has never publicly disclosed exactly how the Elevation API works, but its not rocket science.
- Google has a copy of SRTM (or more likely, the more recent Copernicus DEM) in GeoTIFF format. You can think of this file as a huge image of the Earth where each pixel is a 30m x 30m grid containing the elevation value at that location. This image file (known as a raster) is not particularly useful as there's no easy way to query it (e.g. what is the elevation at these coordinates?) and you'd have to load the entire image into memory even if you wanted to.
- The data from this GeoTIFF file is extracted and stored in a spatial database such as PostGIS. PostGIS automatically maps SRTM's pixel coordinates to latitude and longitude, which allows Google to look up elevation values using SQL statements. Because PostGIS is a raster, you can interpolate between points to find the likely elevation even if you don't have the data.
- The finals step is to wrap the query in an HTTP API e.g.
GET/elevation?lat=49.2827&lng=-123.1207 (Vancouver, Canada).
Google Elevation API use cases
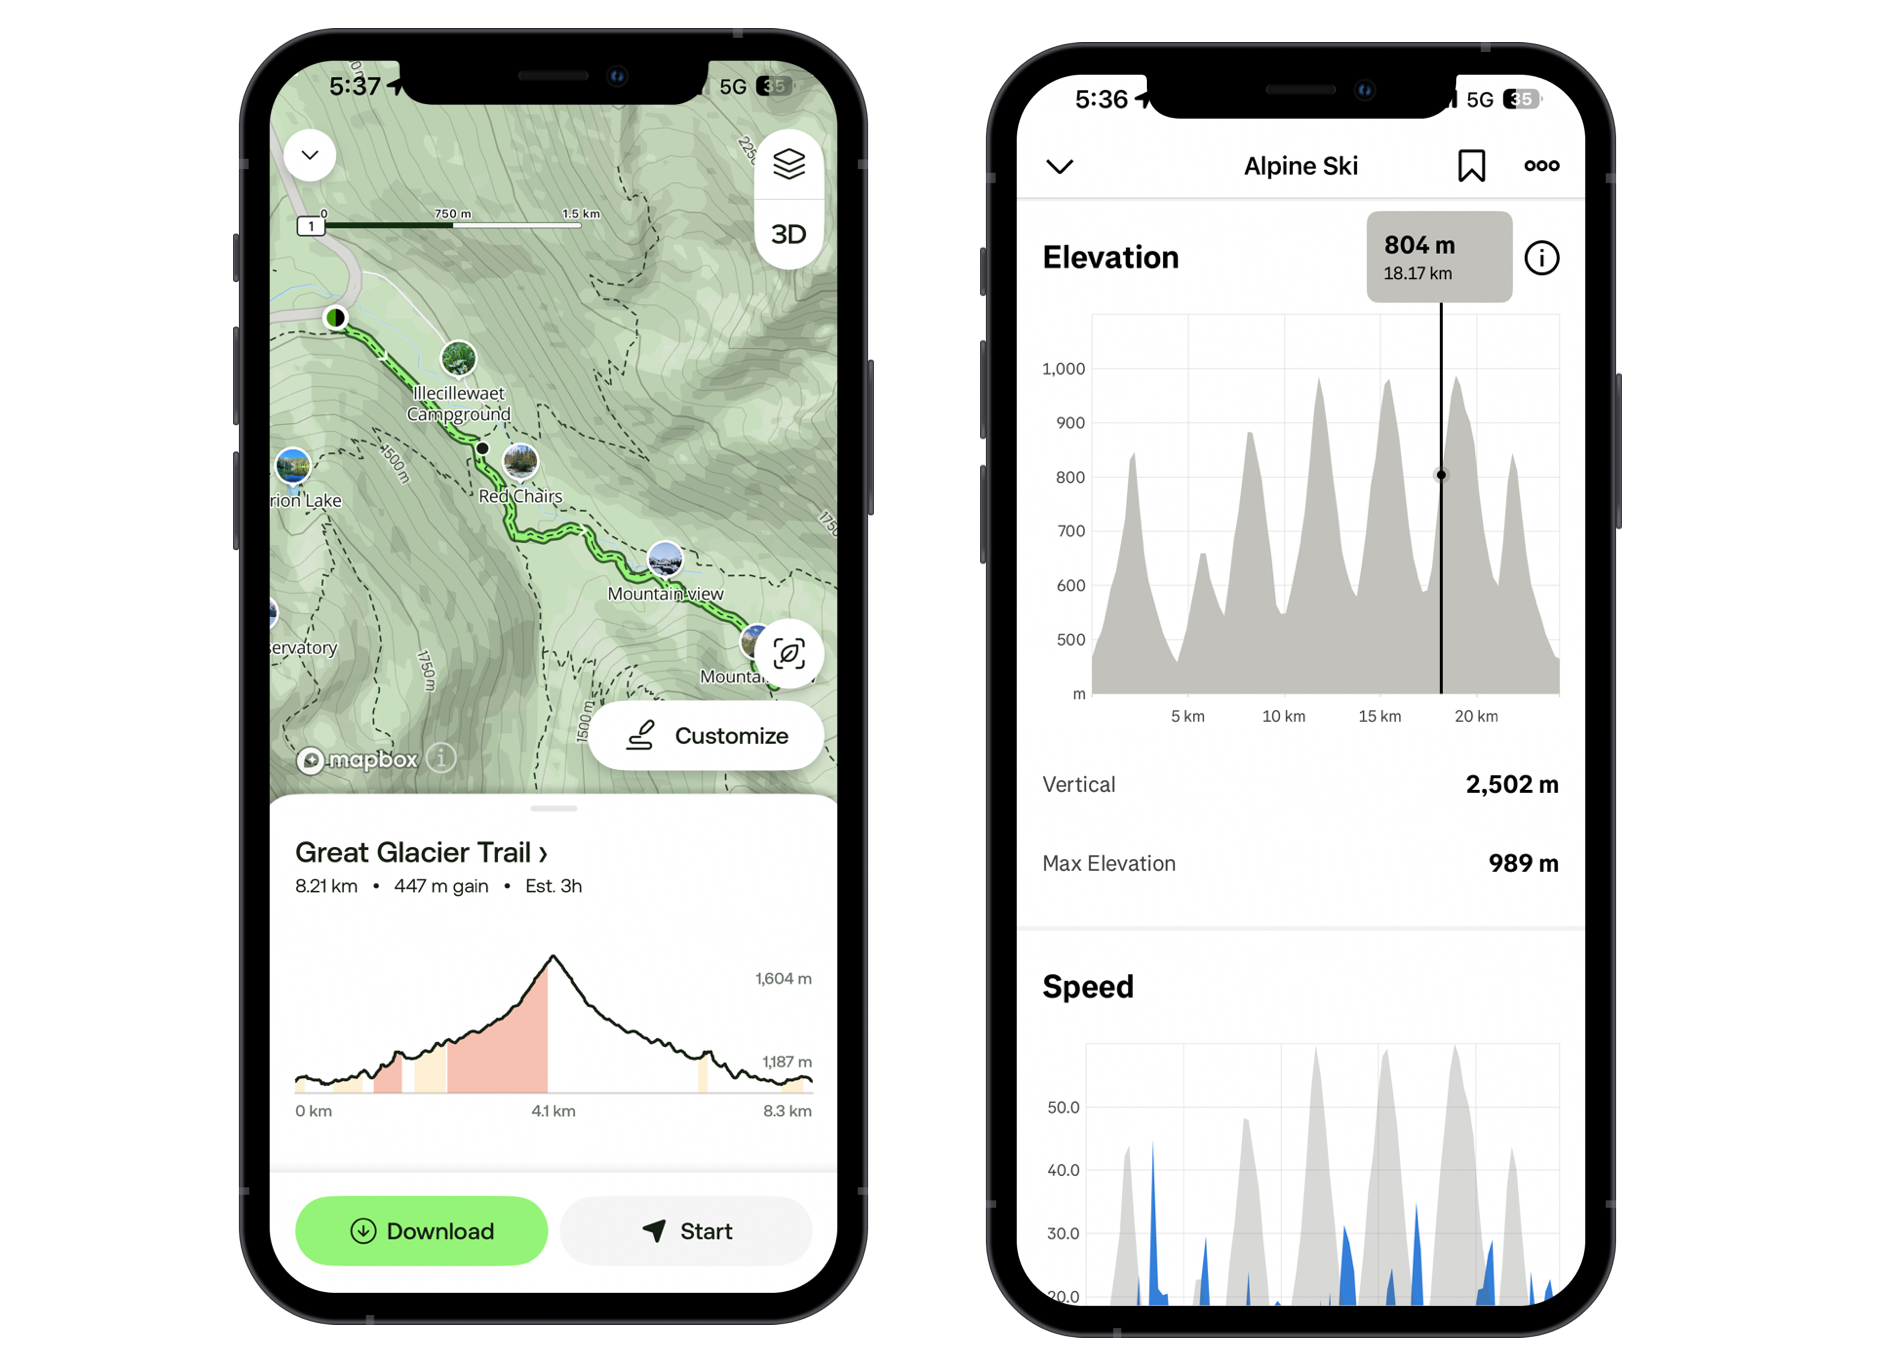
Fitness and outdoor apps like Strava and AllTrails all show elevation gain, elevation profiles and climb difficulty. Whether it’s Google, proprietary Digital Elevation Models (DEMs), or mixed sources, this is the classic Elevation API use case.
However, the companies behind these apps rarely mention which elevation API they use. It’s an implementation detail that sits quietly behind routing, location tracking and activity monitoring. That's also why there are basically no polished, brand name case studies for the Google Elevation API in the way Google publishes them for Routes, Maps, or Places.
However, I am absolutely certain that Strava and AllTrails do not use the Google Elevation API because it would be cost prohibitive to do so (more on this later). Instead, the Google Elevation API’s real customers are not consumer apps with millions of users, but companies that need accurate elevation data right now, not a DEM pipeline. Specifically:
- Electrical vehicle fleets (e.g. Waymo operating in hilly San Francisco) need the elevation along a route because this impacts the time and energy required.
- Utilities building out commercial solar power farms need elevation data to understand how terrain affects solar potential. The Google Solar API only works with rooftop solar, not large scale solar energy engineering and construction.
- Local governments use elevation as a primary input for flood simulation and natural disaster modeling.
- Drone operators need elevation data for flight and mission planning.
- Bike delivery companies in hilly cities like San Francisco, Medellín, or Geneva use the Elevation API to avoid overly steep routes (for an example of this, check out OVO Route Planner).
Google Elevation API example
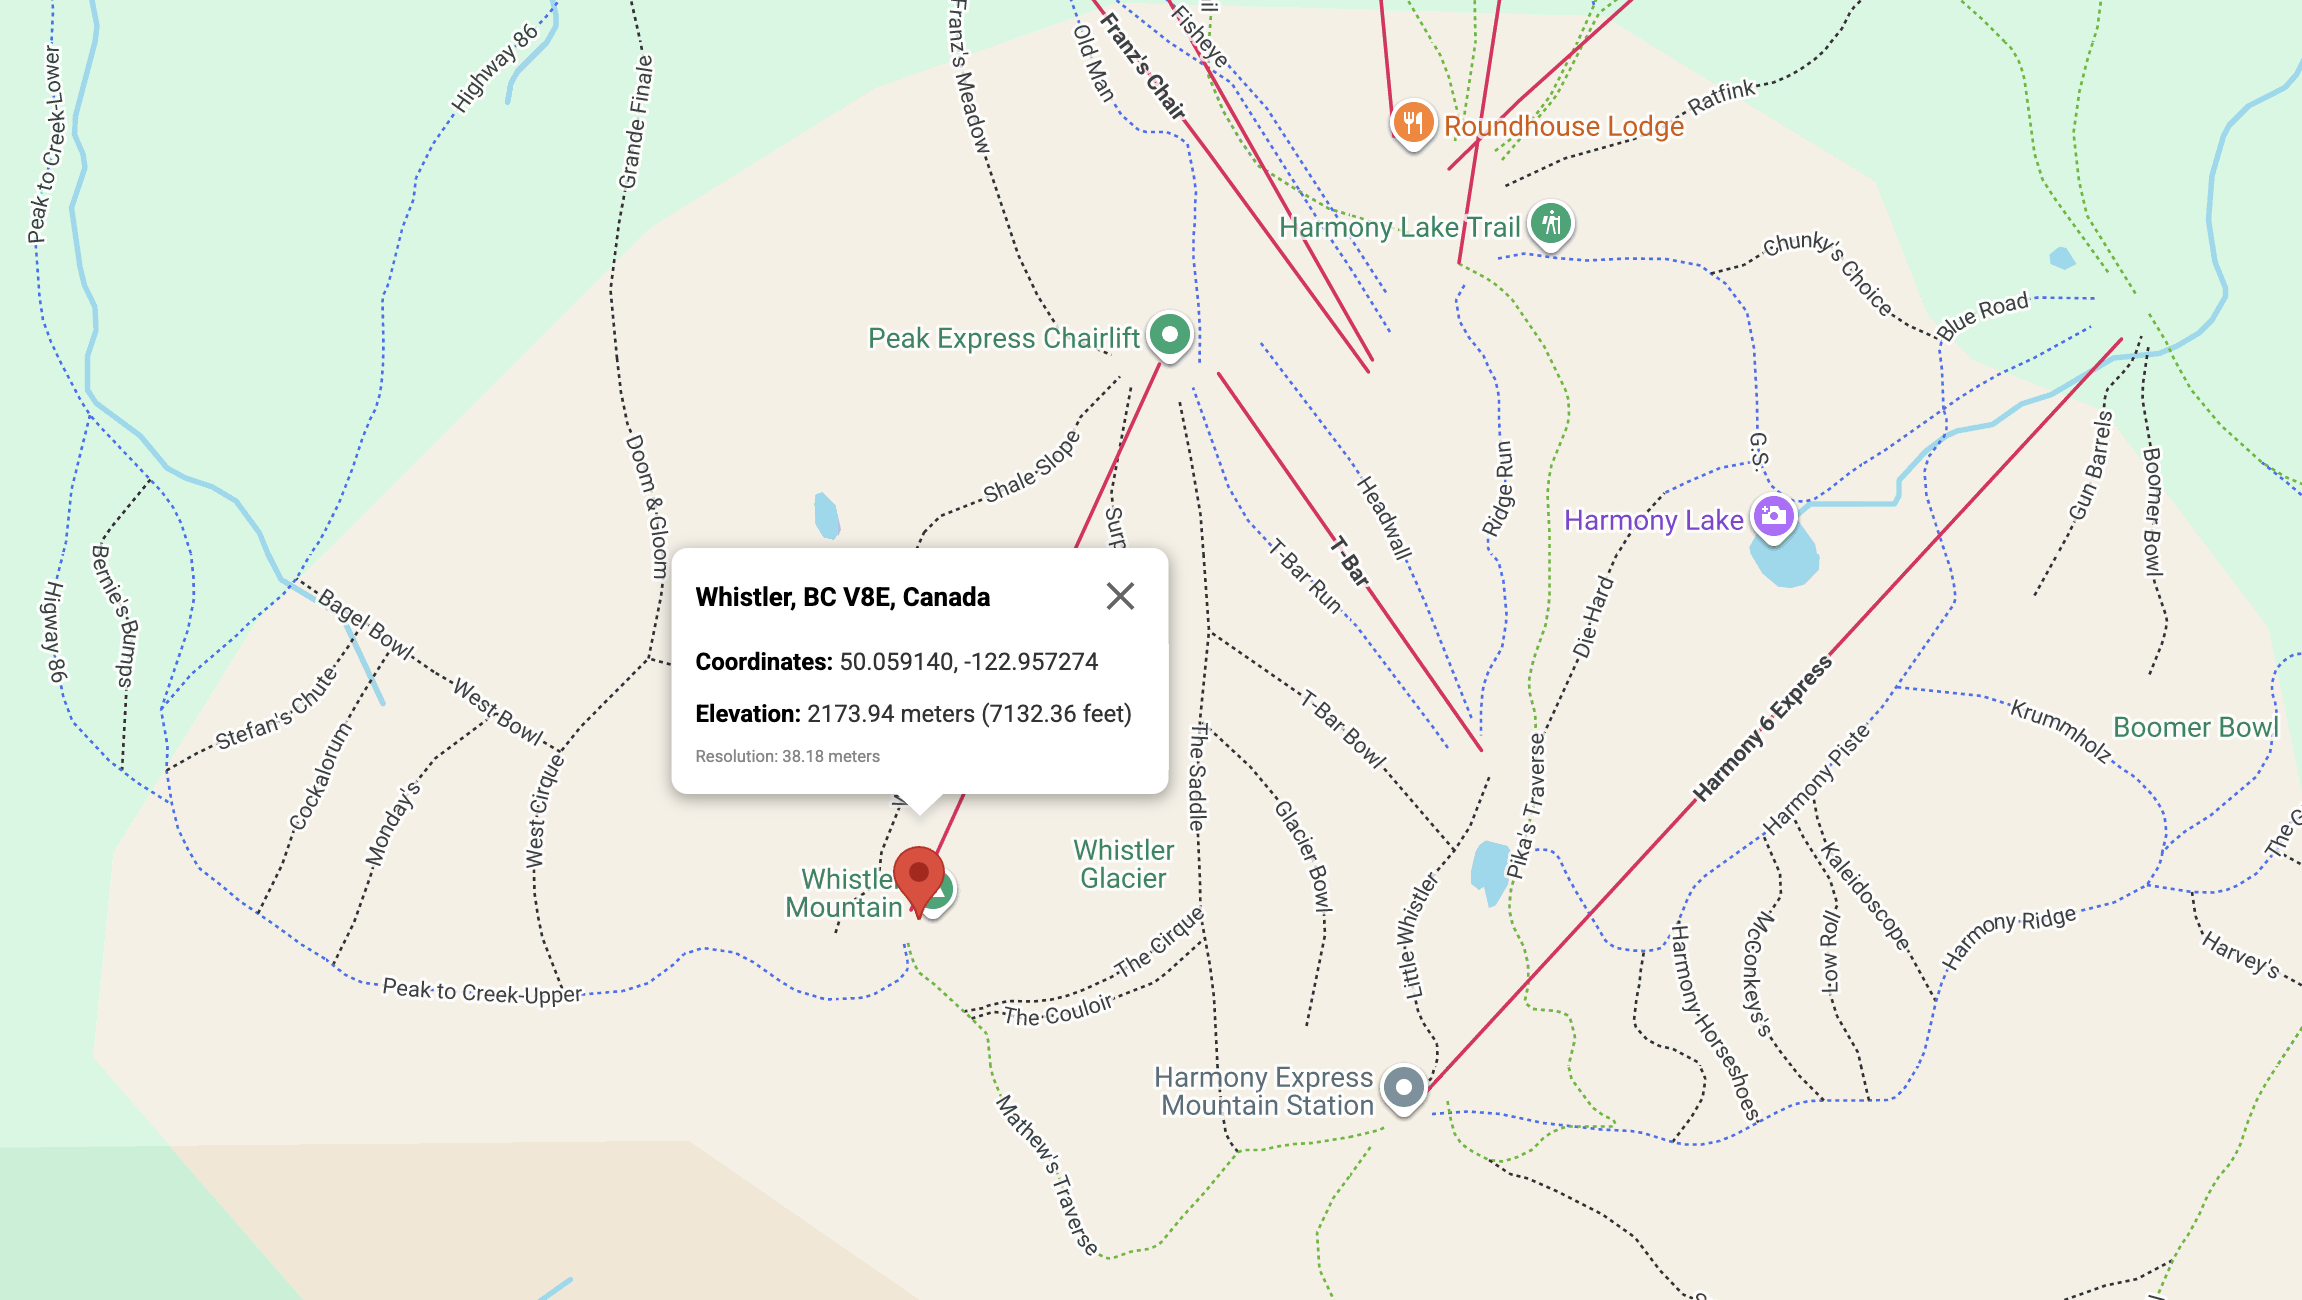
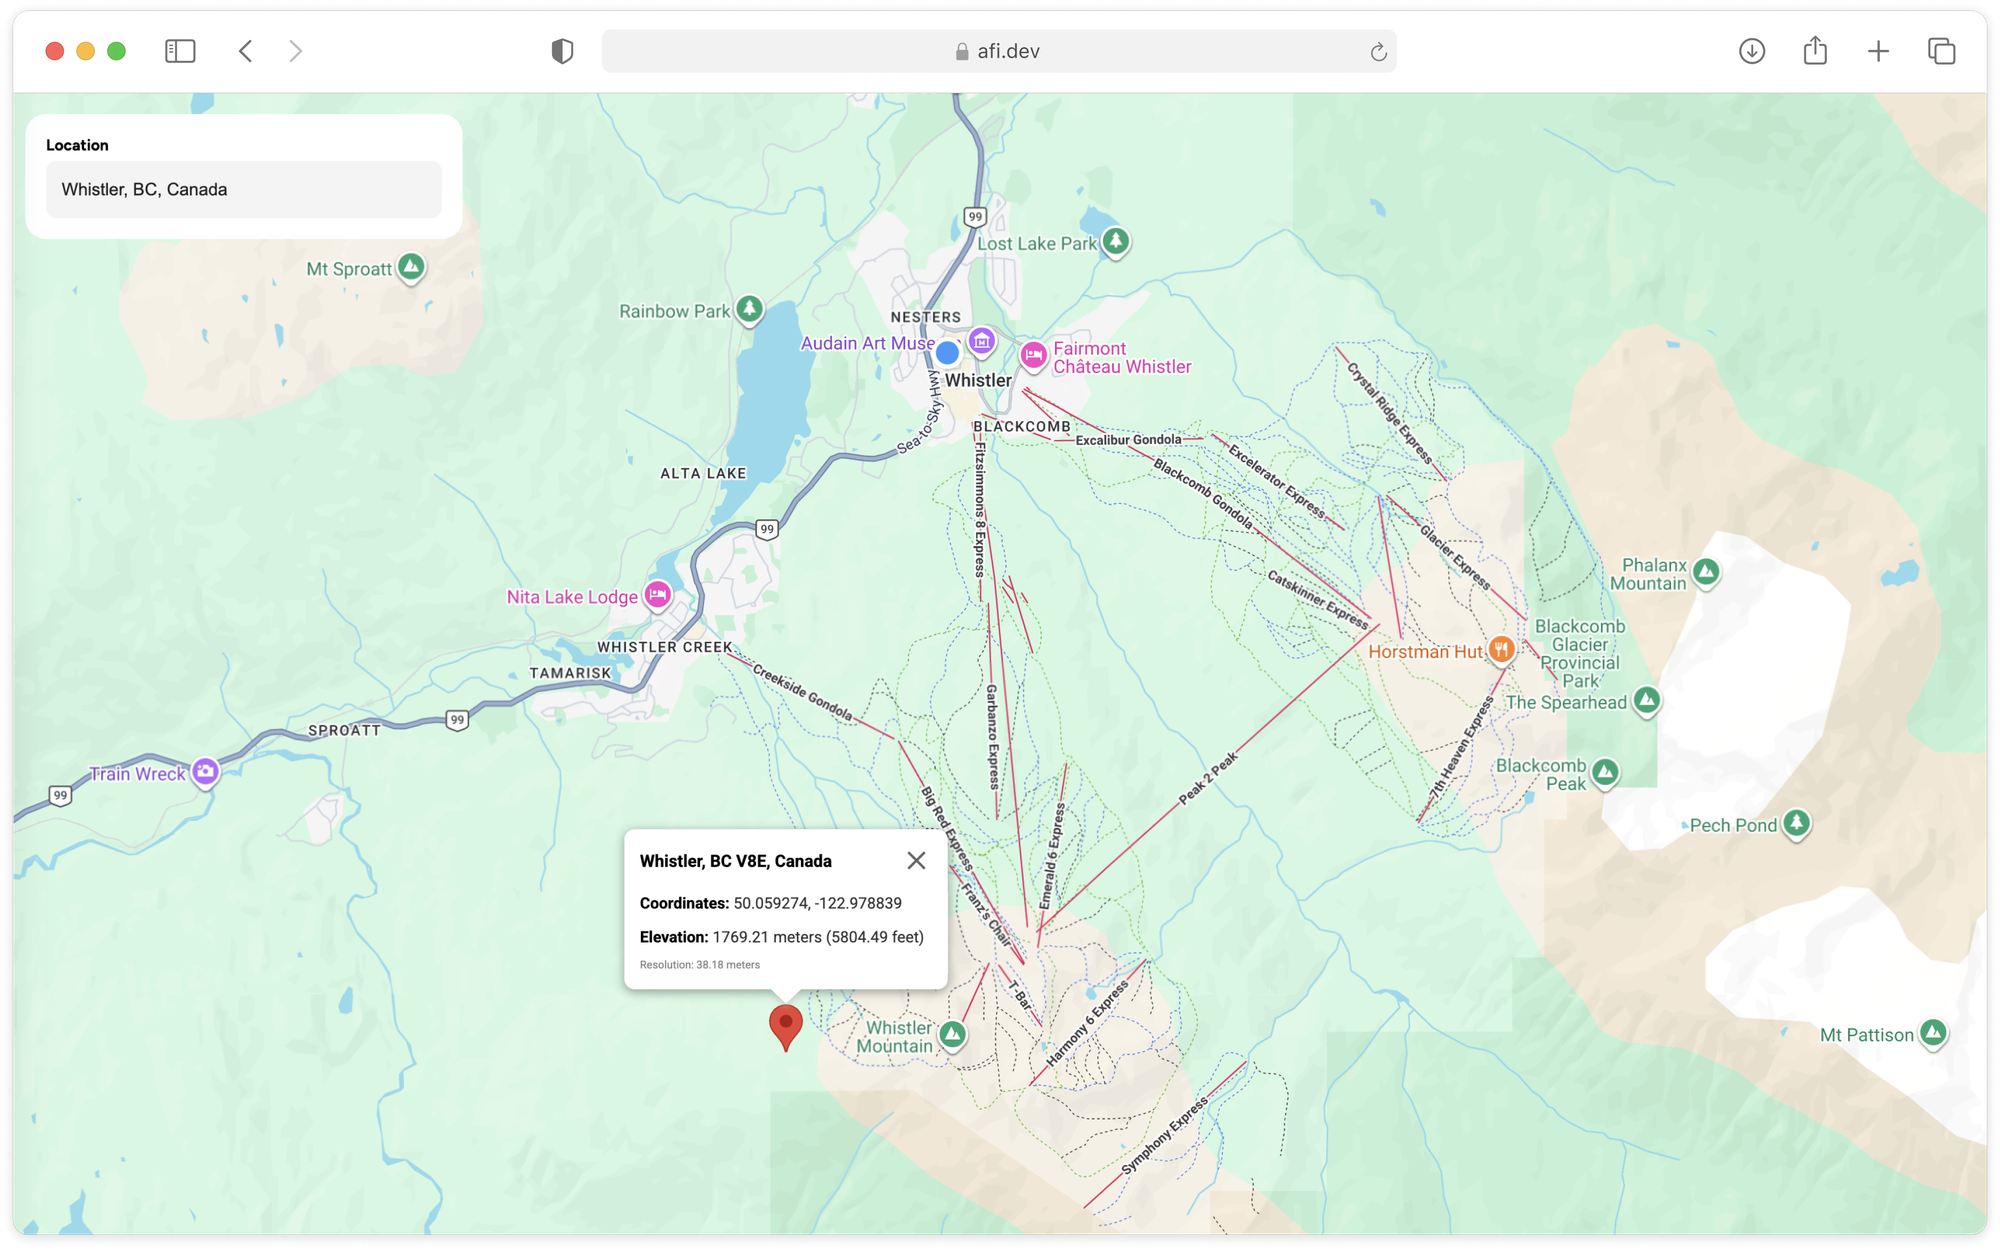
Here's a simple example that uses the Elevation API to get the elevation at the top of Peak Chair on Whistler Mountain in British Columbia, Canada.
Endpoint: GET
https://maps.googleapis.com/maps/api/elevation/json?key={YOUR_API_KEY}
&locations={LOCATIONS}
{YOUR_API_KEY} is your Google Maps API key with the Google Elevation API enabled.
{LOCATIONS} can be one of three things:
- a single location as a comma separated latitude, longitude pair e.g.
locations=49.2827,-123.1207, - an array of coordinates separated using the pipe ('|') character e.g.
locations=49.2827,-123.1207|50.1041188,-123.0839148(note: there's a 512 point limit), - an encoded polyline e.g.
locations=}_wpHbvtmVA^?\\?Z?\\C^CVADAHEPUv@_.
@fAk@hAa@x@k@eAEIYg@i@cAMWWe@a@WA??]?]BK@ELUHKQ]EKEMQ[CG
Endpoint: GET
Response
{
    "results": [
        {
            "elevation": 2173.94091796875,
            "location": {
                "lat": 50.05914,
                "lng": -122.957274
            },
            "resolution": 38.17580795288086
        }
    ],
    "status": "OK"
}
In the results object,
elevation is the elevation of the location in meters relative to the local mean sea level (LMSL).
location give you the latitude and longitude for which the elevation is being computed. Due to gaps in elevation data, this may not always be the same as the coordinates sent in the original request.
resolution is the maximum distance between data points from which the elevation was interpolated, in meters.
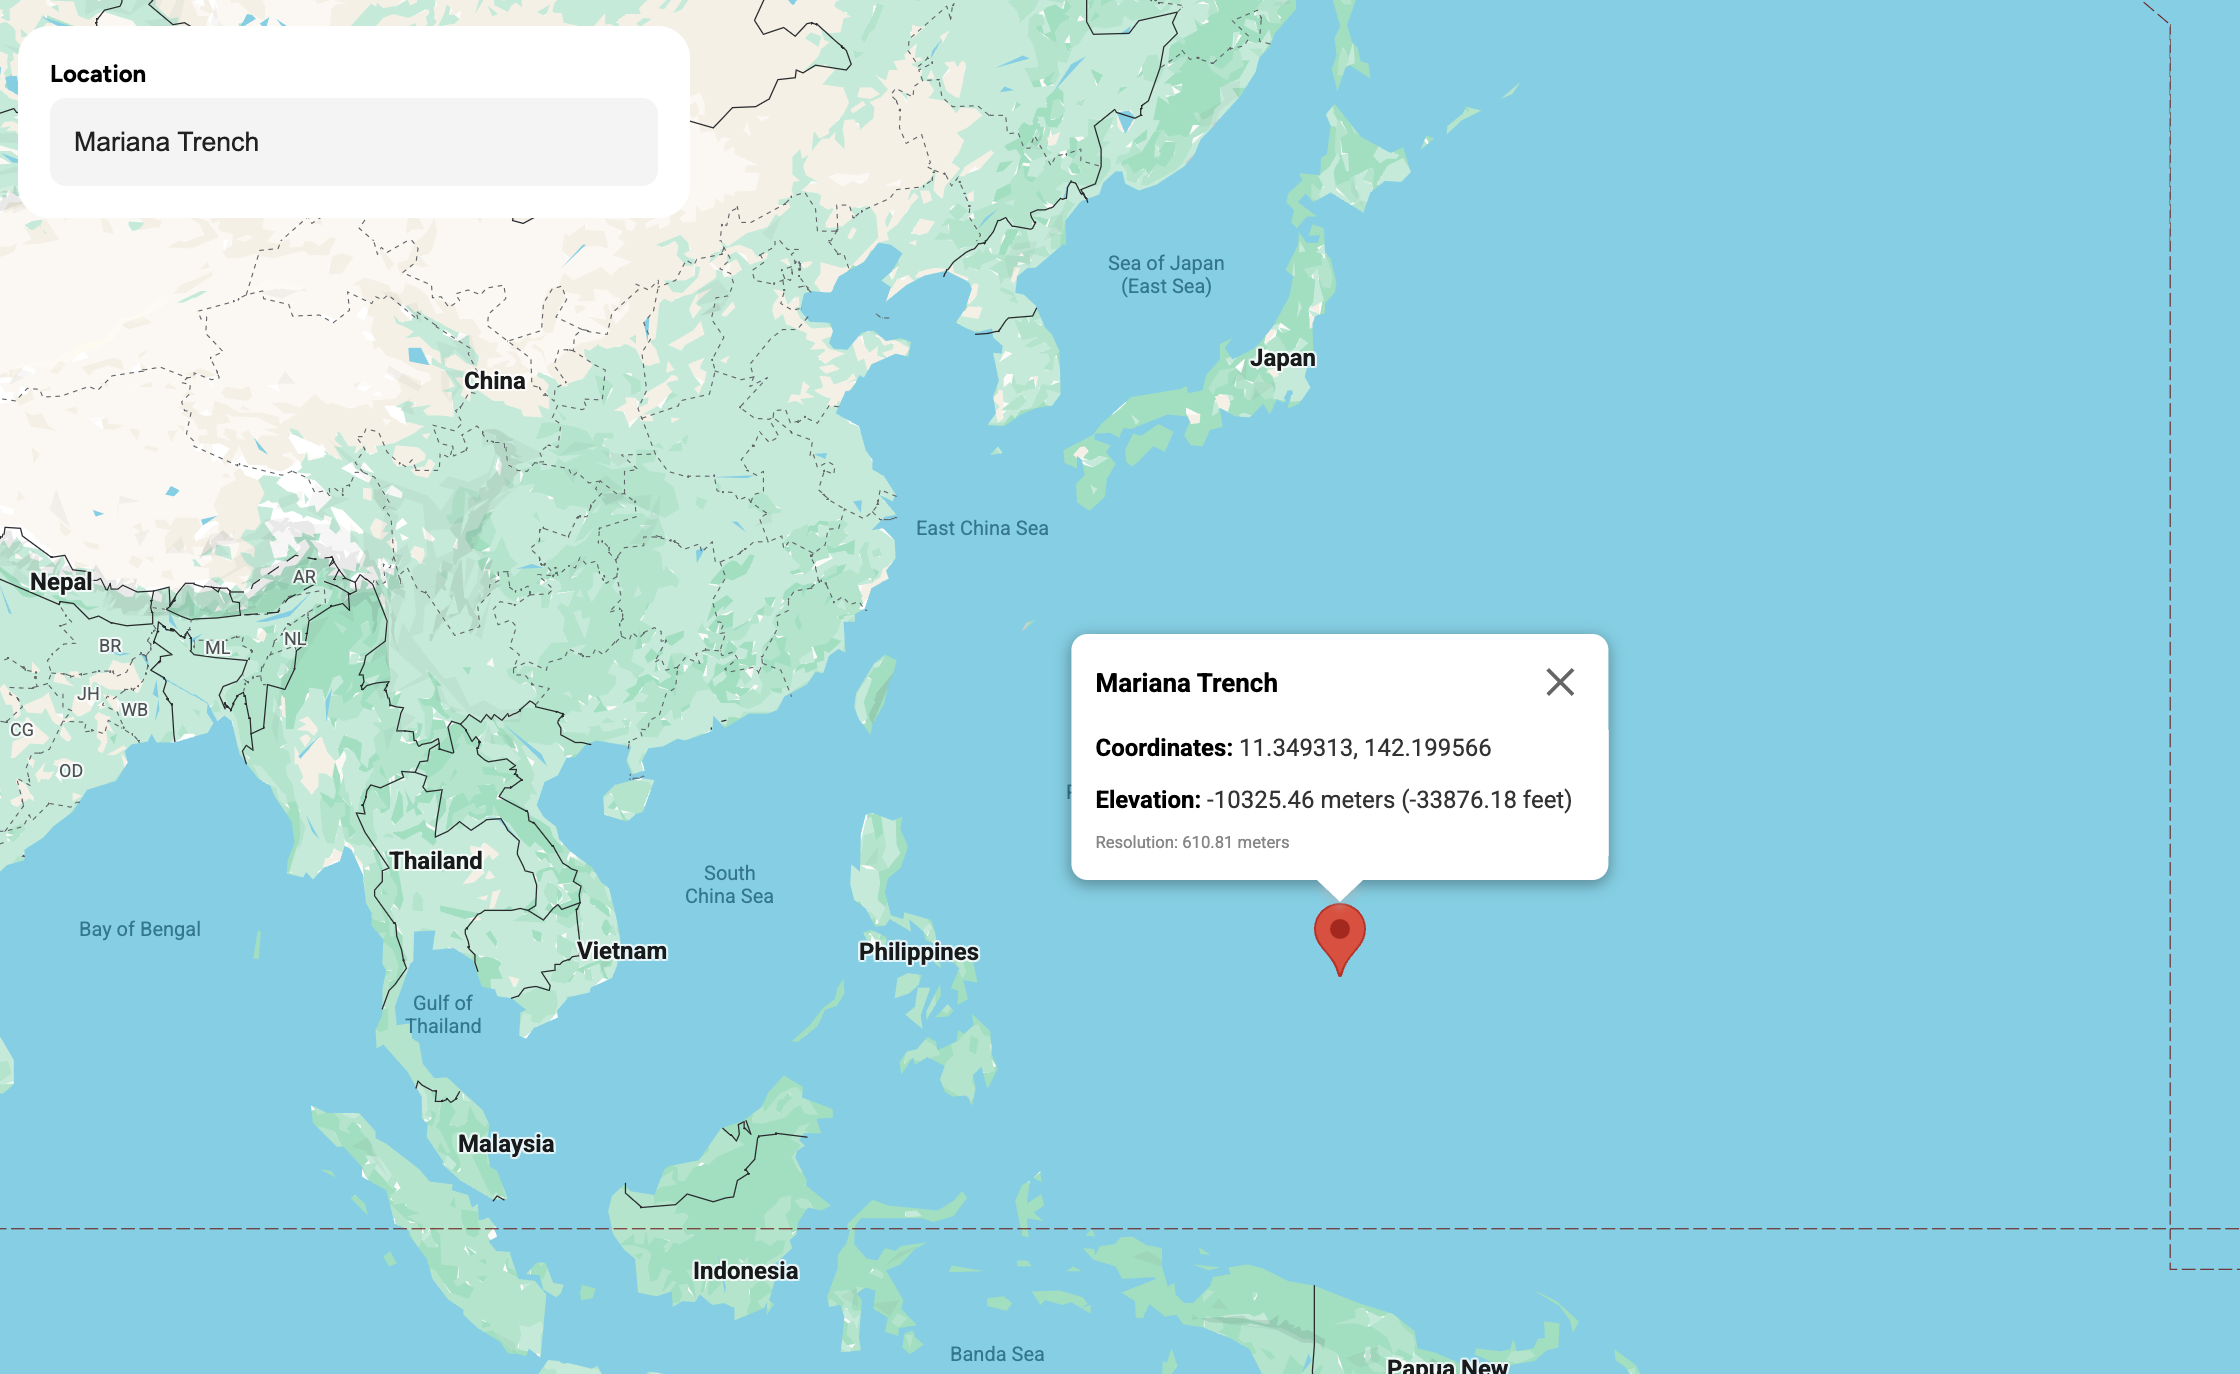
In the example above, the elevation returned for the summit of Whistler Mountain is 2,173.94 m - within 10 meters of the officially recorded elevation of 2,181 m (source). Interestingly, the Elevation API also works for depth. Negative values indicate locations that are below LMSL, including locations on the surface or the ocean floor. For example, the Mariana Trench shows an elevation value of -10,325.46 m.
Google Elevation API key
To get started with the Google Elevation API, you need to first enable it in on your Google Cloud Console. Search for the "Maps Elevation API" in the search bar at the top and click [Enable] to begin using it in your Google Cloud project.

The easiest way to check that its working is to make a simple test request by plugging in your active Google Maps API key with {YOUR_API_KEY} into the example above and pasting the request into your browser. If you get a valid response, that's great! If you get a "The Elevation API has not been used in project ..." error, make sure that the Elevation API is enabled for this key in Google Maps Platform > Keys & Credentials.
Google Elevation API pricing
Like other Google Maps Platform APIs, the Elevation API follows a pay-as-you-go pricing model, with volume discounts that lower the cost as your usage increases. Pricing starts at $5.00 CPM (cost per thousand) and there's a free usage cap of 5,000 API calls per month.
| 0 - 5,000 | 5,000 - 100k | 100k - 500k | 500k - 1M | 1M - 5M | 5M+ | |
|---|---|---|---|---|---|---|
| Elevation API | FREE | $5.00 | $4.00 | $3.00 | $1.50 | $0.38 |
As with other Google Maps services, working with a Google Maps Partner can provide access to discounted pricing at higher volumes.
Google Elevation API alternatives
$5.00 CPM is a very reasonable price to pay for accurate elevation data on demand, especially when you consider the engineering effort required to host your own elevation dataset and build a reliable API around it. However, for outdoor and fitness apps that need to track elevation data for hundreds of millions of activities each year, the cost can get quite prohibitive.
Take Strava, for example. In 2023, they reported that users were uploading 40 million activities per week. Even if we assume zero growth since then (which seems unlikely given their planned mid-2026 IPO), and that each activity contains no more than 512 GPS points (the hard cap on locations) it would cost them roughly 40 million × 4 weeks × $0.38 = $60,800 per month just to generate elevation profiles for every activity.
Because elevation data changes very slowly (Mount Everest, for example, rises only 4 - 10 mm per year due to tectonic activity) Google doesn’t have a significant data quality advantage here. That’s unlike with its real time products like the Routes API or GMPRO, which resell live traffic and congestion data sourced from millions of Google Maps users. So if your app is going to need lots of elevation data, it probably would be more cost effective to build out your own elevation stack using open source. You could also consider paid alternatives to the Google Elevation API such as GPXZ, Mapbox DEM or HERE Maps DEM. GPXZ in particular is a great choice if you are serious about mapping. They use the best open datasets for each region around the world, have excellent technical support (in most cases you will be speaking directly with Andrew Nisbet, the founder) and best of all, you’re allowed to cache the results indefinitely.
But if you need something quick that just works, the Google Elevation API is a great choice. It takes less than a minute to set up, and your usage will likely stay within the free tier. It's also easier to get approval to use it if your company or team already has a Google Cloud account, so it's often just the default choice for many people.
Building an elevation finder app using the Google Elevation API
In this final section, we’ll use the Google Elevation API to build an app that lets you find the elevation at any location in the world (demo / source code). Users can drag a marker anywhere on a Google Map and instantly retrieve the elevation at that point.
There are two ways to follow along. If you have some software engineering experience, you should fork google_elevation_demo and google_elevation_backend and run the app locally. Try making small changes or new features to the app. If you don't want to pull code from GitHub, you can still play around with a live demo at https://google-elevation-demo.afi.dev/.
How our code is organized
google_elevation_demo is a single page React app that uses Vite as the build tool and development server. The app works together with google_elevation_backend, which retrieves elevation data from the Google Elevation API. As with our other tutorials, we'll be using the super useful Google Maps React component library from @vis.gl/react-google-maps to quickly scaffold our app and manage map interactions and UI in a way that is consistent with React. The <Map/> and <DraggableMarker/> components are examples of this.
App.jsx
App.jsx is the main entry point of the app. It manages the overall layout, routing, structure, and handles calls to google_elevation_backend to retrieve elevation data from the Google Elevation API.
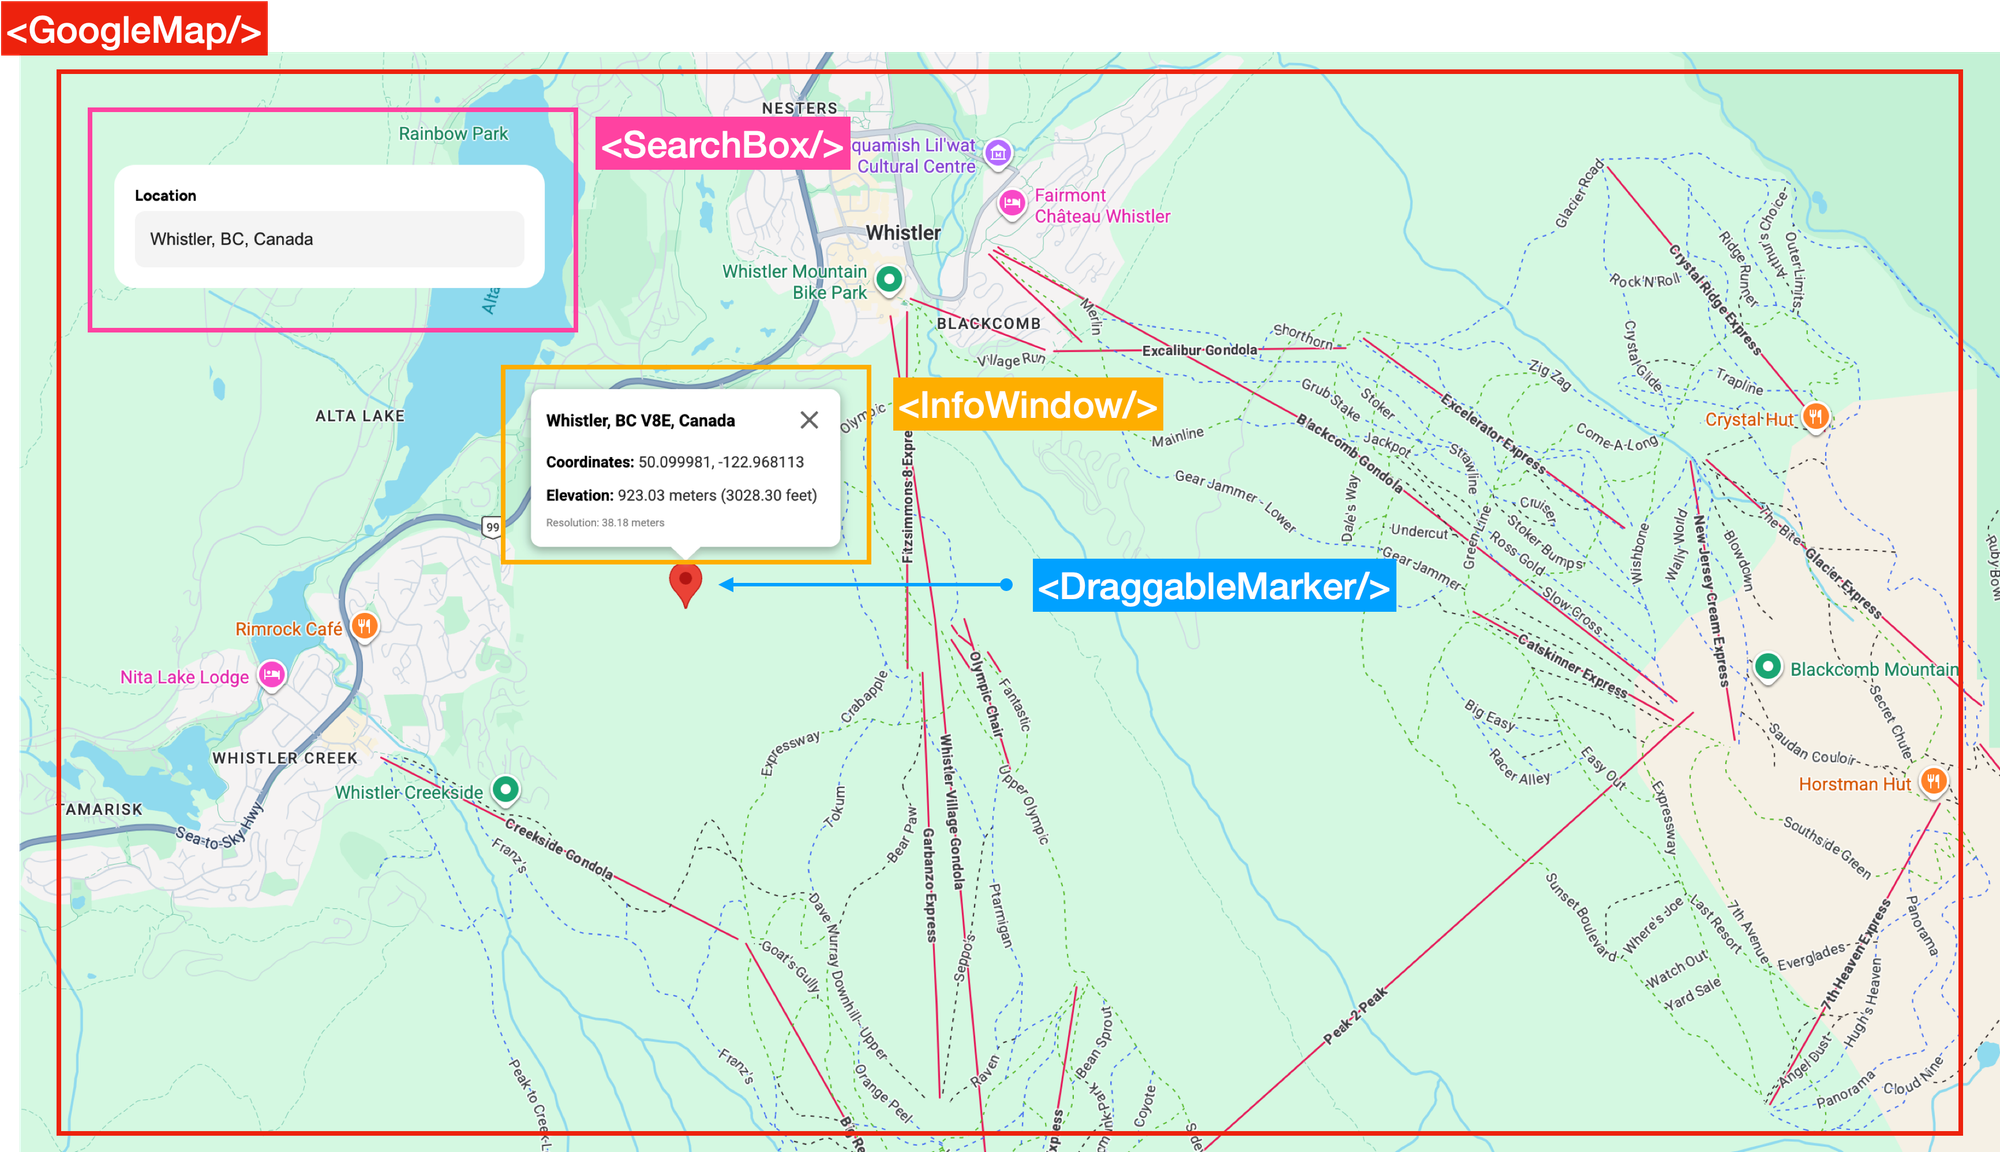
There are four main components in App.jsx.
<SearchBox/>, which holds the Place Autocomplete text box (<PlaceAutocompleteInput/>) that is used to switch the map view to any location worldwide.<GoogleMap/>, a React wrapper around the 2D Maps JavaScript API provided by the @vis.gl/react-google-maps library. The map is set to terrain view.<DraggableMarker/>(child of<GoogleMap/>), the marker components for the draggable red balloon pin and its corresponding reverse geocoded location (displayed on the map as a blue dot), and<InfoWindow/>(child of<DraggableMarker/>), a temporary overlay that shows up when<DraggableMarker/>is clicked. This pop up shows theelevationof the pin location, together with the actual latitude and longitude of the pin marker
/*** App.jsx ***/
function App() {
  //... Showing return statement only

  return (
    <APIProvider apiKey={import.meta.env.VITE_GOOGLE_API_KEY}>
      <div className="App">
        <SearchBox onSelectAutocompletePlace={setAutocompletePlace} />

        <GoogleMap
          autocompletePlace={autocompletePlace}
          elevation={elevation}
          onDragEnd={handleDragEnd}
        />
      </div>
    </APIProvider>
  );
}

export default App;
When the user selects a new location using the search box (see the section on SearchBox.jsx below), an autoComplete place object is created and fetchElevation() is called. After receiving a response from the /elevation endpoint of google_elevation_backend, the elevation data is stored in an elevation object (specifically using the React state setter const [elevation, setElevation] = useState(null);) where it is used in the <GoogleMaps/> component for display in a marker popup infowindow.
/*** App.jsx ***/
useEffect(() => {
  if (autocompletePlace) {
    // Extract coordinates and fetch elevation
    const lat = autocompletePlace.geometry.location.lat();
    const lng = autocompletePlace.geometry.location.lng();

    // Fetch elevation data for the selected place
    const fetchElevation = async () => {
      try {
        const elevationRes = await axios.get(
          `${import.meta.env.VITE_API_URL}/elevation`,
          {
            params: { lat, lng },
          },
        );
        console.log("Autocomplete elevation:", elevationRes);
        if (
          elevationRes.data &&
          elevationRes.data.results &&
          elevationRes.data.results.length > 0
        ) {
          setElevation(elevationRes.data.results[0]);
        }
      } catch (error) {
        console.error("Error fetching elevation data:", error);
        setElevation(null);
      }
    };

    fetchElevation();
  }
}, [autocompletePlace]);
SearchBox.jsx
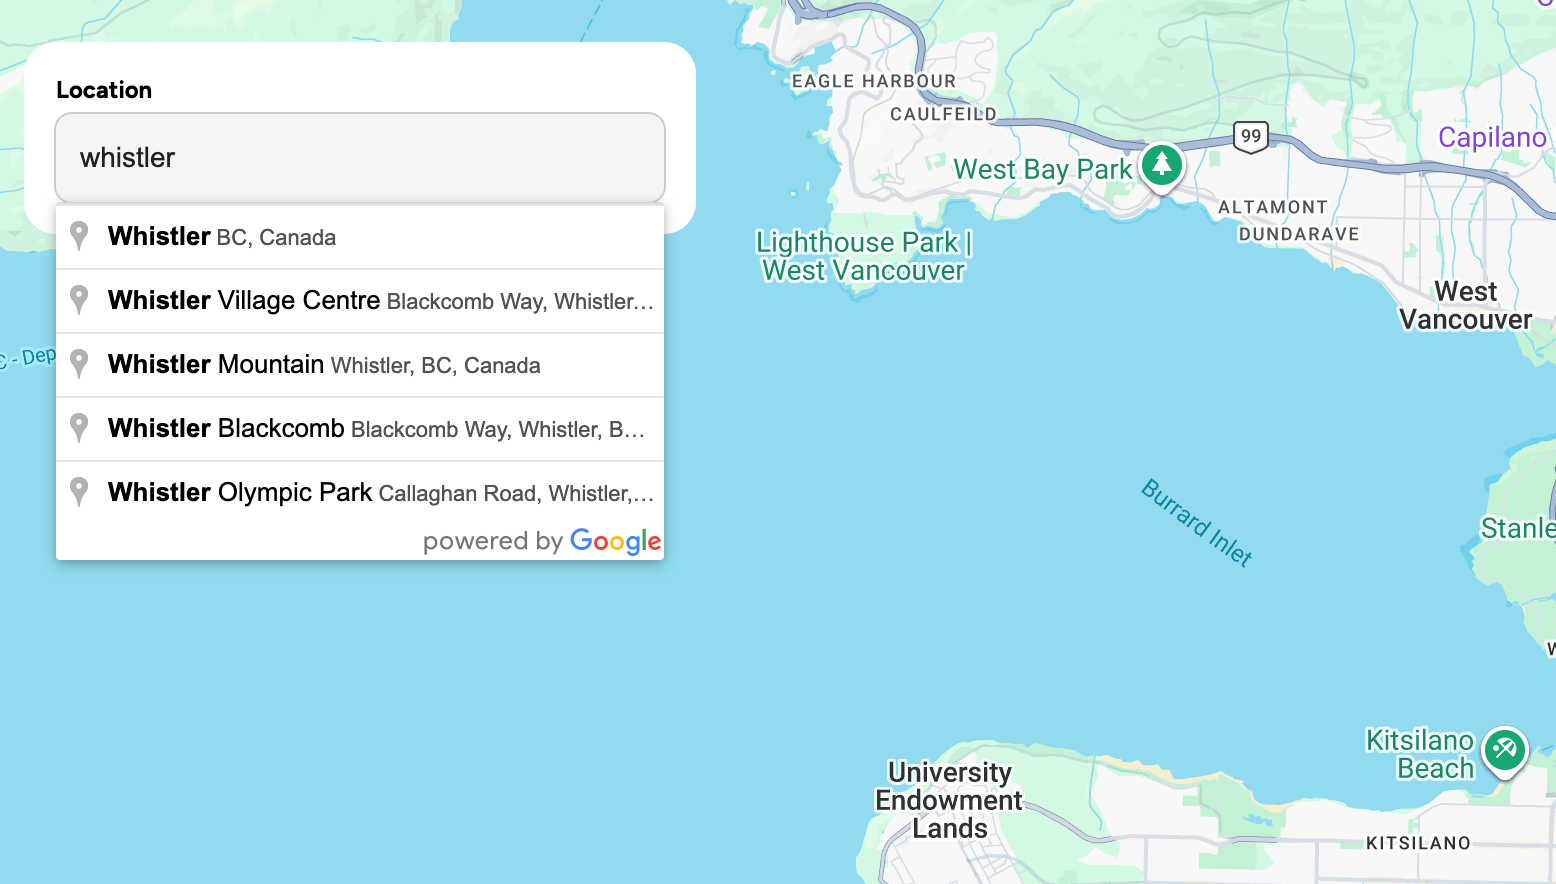
<SearchBox/> contains the <PlaceAutocompleteInput/> address field. As the user types, an autocomplete dropdown shows suggested places. When a user selects a location e.g. “Whistler, BC”, the map pans to that spot and displays a marker with an info window showing the elevation data.
/*** components/SearchBox.jsx ***
import { useMap, useMapsLibrary } from "@vis.gl/react-google-maps";
import { useCallback, useEffect, useState } from "react";

import Icon from "~/components/Icon";
import PlaceAutocompleteInput from "~/components/PlaceAutocompleteInput";
import "./SearchBox.scss";

const SearchBox = ({ onSelectAutocompletePlace }) => {
  const map = useMap();
  const googleMaps = useMapsLibrary("places");

  const [placeService, setPlaceService] = useState(null);

  useEffect(() => {
    if (googleMaps && map) {
      setPlaceService(new googleMaps.PlacesService(map));
    }
  }, [map, googleMaps]);

  const handlePlaceSelect = useCallback(
    (autocompletePlace) => {
      onSelectAutocompletePlace(autocompletePlace);
    },
    [placeService],
  );

  return (
    <div className="SearchBox">
      <label className="label">Location</label>

      <div className="input-group">
        <PlaceAutocompleteInput onPlaceSelect={handlePlaceSelect} />
      </div>
    </div>
  );
};

export default SearchBox;
PlaceAutocompleteInput.jsx
The magic behind the address autocomplete search box takes place in the <PlaceAutocompleteInput/> text input field. The field is given the ref={inputRef} property which when bound to a new Google Places Autocomplete instance with the line: new places.Autocomplete(inputRef.current, options), creates an autocomplete widget dropdown menu with predicted place options.
It also sets up an event listener for the place_changed event which when fired allows the app to pass the selected place's details (place_id, geometry, name, and formatted_address) to a google.maps.places.Autocomplete object. This data is passed on to <SearchBox/> via the onPlaceSelect() prop and eventually passed to App.jsx where it is saved in state.
/*** components/PlaceAutoCompleteInput.jsx ***
import { useMapsLibrary } from "@vis.gl/react-google-maps";
import { useEffect, useRef, useState } from "react";

const PlaceAutocompleteInput = ({ onPlaceSelect }) => {
  const [placeAutocomplete, setPlaceAutocomplete] = useState(null);
  const inputRef = useRef(null);
  const places = useMapsLibrary("places");

  useEffect(() => {
    if (!places || !inputRef.current) return;

    const options = {
      fields: ["place_id", "geometry", "name", "formatted_address"],
    };

    setPlaceAutocomplete(new places.Autocomplete(inputRef.current, options));
  }, [places]);

  useEffect(() => {
    if (!placeAutocomplete) return;

    placeAutocomplete.addListener("place_changed", () => {
      onPlaceSelect(placeAutocomplete.getPlace());
    });
  }, [onPlaceSelect, placeAutocomplete]);

  return (
    <div className="PlaceAutocompleteInput">
      <input ref={inputRef} />
    </div>
  );
};

export default PlaceAutocompleteInput;
GoogleMap.jsx
GoogleMap.jsx, found in components/GoogleMap/index.jsx, renders an interactive Google Map with scroll, zoom and click interactions built in. When a new location is selected from the address autocomplete <SearchBox/>, the coordinates are stored in an autocompletePlace object which is passed down to <GoogleMap/> via props.
GoogleMap.jsx handles three main tasks:
- Centers the map at a new location whenever
autocompletePlaceis updated. - Displays a draggable red pin marker at the
autocompletePlacelocation. - Calls the
handleDragEnd()function (passed through theonDragEndprop) when the user finishes dragging the red pin marker.
/*** components/GoogleMap/index.jsx ***
import { Map } from "@vis.gl/react-google-maps";
import MapHandler from "./MapHandler";
import DraggableMarker from "./DraggableMarker";

const DEFAULT_CENTER = { lat: 49.25307278849622, lng: -123.12095840000302 };

const GoogleMap = ({
  autocompletePlace,
  reversePlace,
  elevation,
  onDragEnd,
}) => {
  return (
    <div className="GoogleMap">
      <Map
        style={{
          height: "100dvh",
          width: "100dvw",
        }}
        defaultZoom={12}
        mapId={import.meta.env.VITE_GOOGLE_MAP_ID}
        defaultCenter={DEFAULT_CENTER}
        gestureHandling="greedy"
        disableDefaultUI
        reuseMaps
      >
        <MapHandler place={autocompletePlace} />

        {autocompletePlace && (
          <DraggableMarker
            place={autocompletePlace}
            reversePlace={reversePlace}
            elevation={elevation}
            onDragEnd={onDragEnd}
          />
        )}
      </Map>
    </div>
  );
};

export default GoogleMap;
Like all of our Google Maps related blog posts and demos, GoogleMap.jsx uses the @vis.gl/react-google-maps library to implement the Google Maps Javascript API in a React centric way. It's the default way to implement Google Maps on the frontend these days, and is maintained by the vis.gl team, the same group behind Deck.gl, Kepler.gl etc so you are guaranteed deep expertise and ongoing updates.
DraggableMarker.jsx

The <DraggableMarker/> component uses <AdvancedMarker/> from the @vis.gl/react-google-maps library, which is a React wrapper around Google’s AdvancedMarkerElement. It integrates smoothly with React state and re-renders efficiently when props like position, zIndex, or children change.
/*** components/GoogleMap/DraggableMarker.jsx ***/
<AdvancedMarker
  ref={markerRef}
  draggable={true}
  zIndex={2}
  position={position}
  onDragEnd={handleDragEnd}
  onClick={() => setInfoOpen((prev) => !prev)}
>
  <Pin />
</AdvancedMarker>;
In DraggableMarker.jsx, the component renders an <AdvancedMarker draggable={true} />. This enables users to drag the marker on the map—functionally equivalent to calling marker.setDraggable(true) in the plain JavaScript Maps API.
When clicked on, Google Maps automatically displays an "X" icon at the base of the marker to indicate it’s draggable. This behavior comes from the Google Maps Web Components API and is handled natively.
When the user finishes dragging the marker and drops it elsewhere on the map:
- The
onDragEndevent fires. - The
handleDragEnd(e)function is called. - The event object
econtains the new coordinates of the marker. setPosition(location)updates the local React state of<DraggableMarker />with the new location.
/*** components/GoogleMap/DraggableMarker.jsx ***/
const handleDragEnd = (e) => {
  const location = { lat: e.latLng.lat(), lng: e.latLng.lng() };
  setPosition(location);
  onDragEnd(location);
};
The new location is then passed to the onDragEnd() callback which is received via props from App.jsx. In App.jsx:
onDragEndpoints to a function calledhandleDragEnd()handleDragEnd()then callshandleSearchPlace()
const handleSearchPlace = async ({ lat, lng }) => {
  // Fetch elevation data
  console.log("Fetching elevation for:", lat, lng);
  try {
    const elevationRes = await axios.get(
      `${import.meta.env.VITE_API_URL}/elevation`,
      {
        params: { lat, lng },
      },
    );
    console.log("Elevation response:", elevationRes);
    if (
      elevationRes.data &&
      elevationRes.data.results &&
      elevationRes.data.results.length > 0
    ) {
      setElevation(elevationRes.data.results[0]);
    }
  } catch (error) {
    console.error("Error fetching elevation data:", error);
    setElevation(null);
  }
};
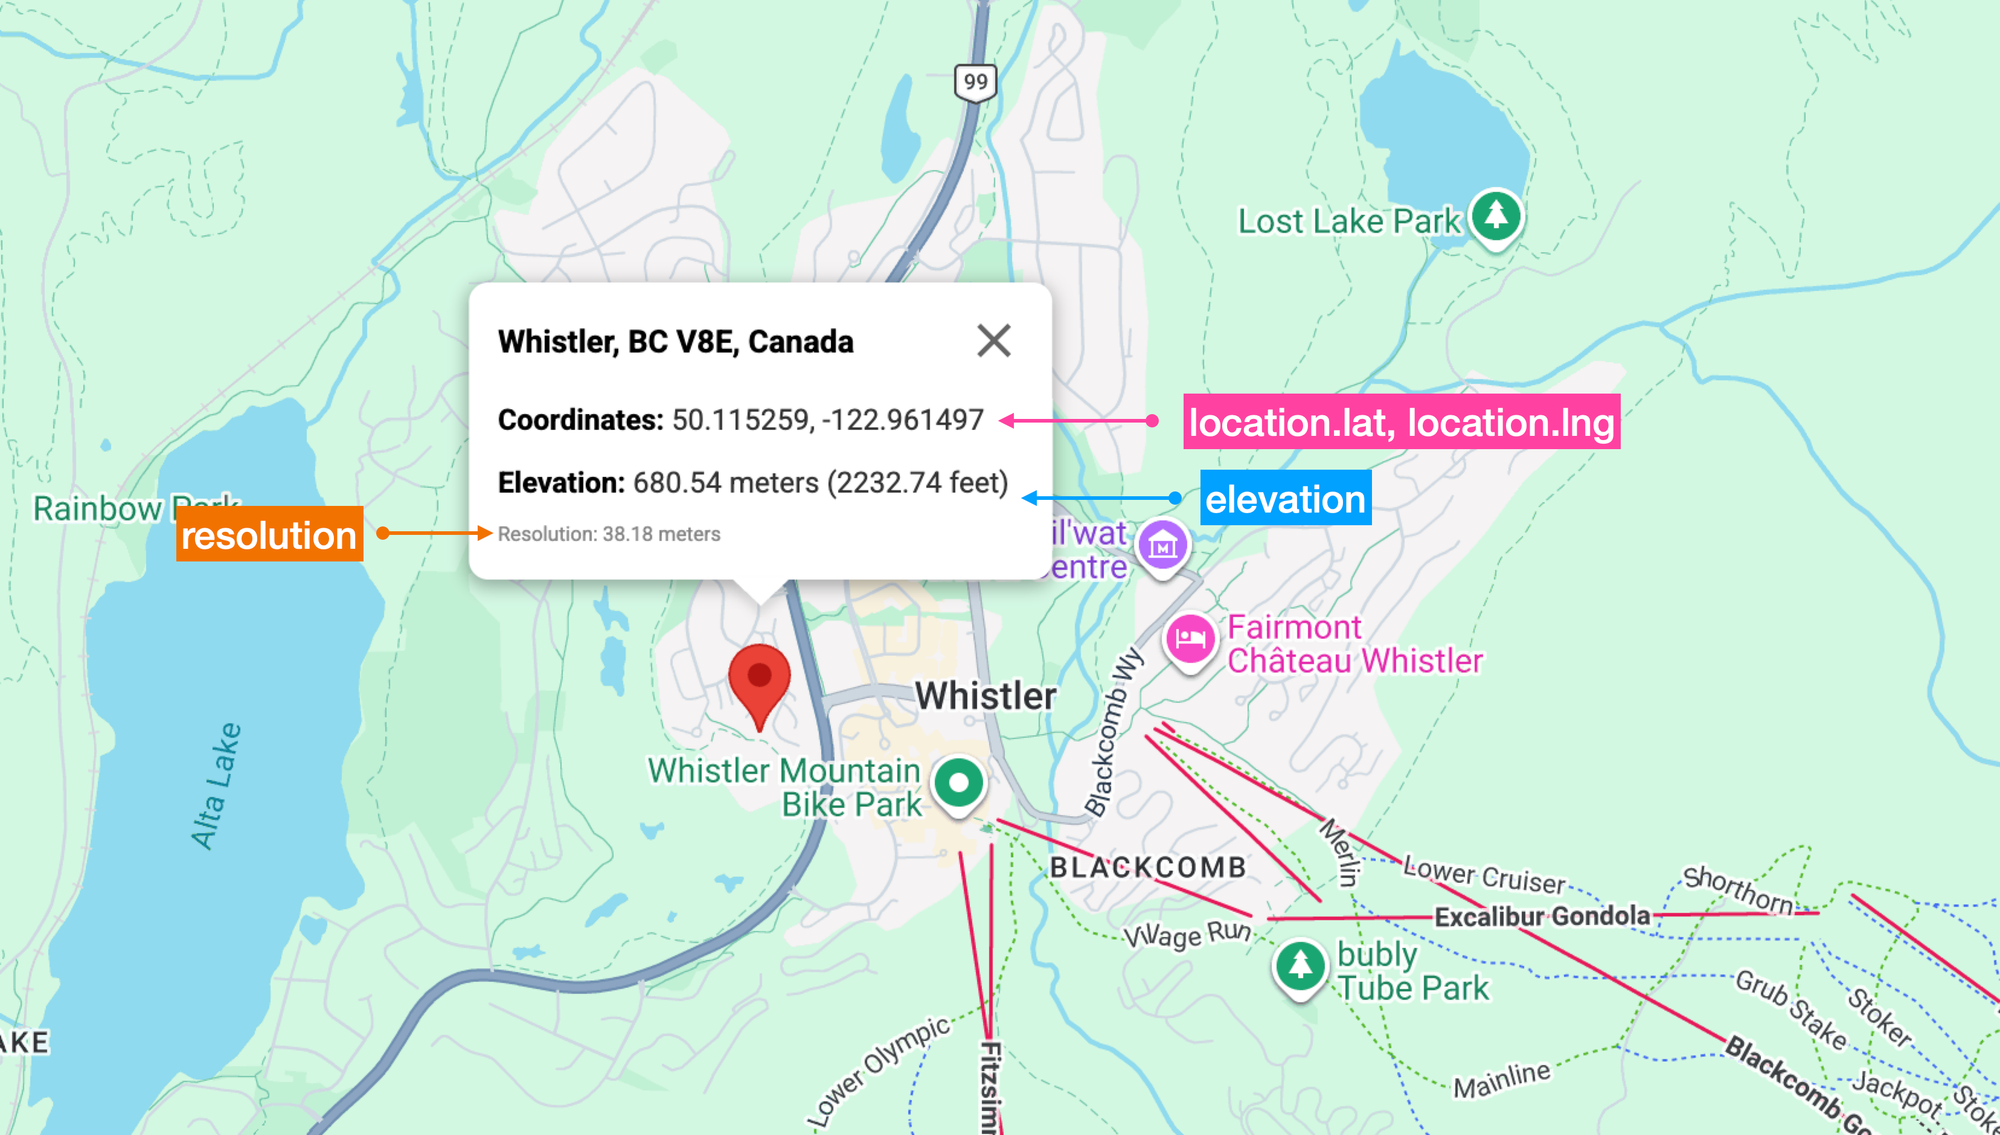
That final method wraps the logic to call the Google Elevation API with the new coordinates and save the elevation data in state with the line setElevation(elevationRes.data.results[0]);. This elevation data takes the form of an ElevationResult object that looks like this:
{
  "elevation": 671,
  "location": {
    "lat": 50.11698706054937,
    "lng": -122.9557315631559
  },
  "resolution": 38.17580795288086
}
The information is shown using the <InfoWindow/> component, a React wrapper for the Google Maps InfoWindow. Like <GoogleMap/>, it comes out of the box with the @vis.gl/react-google-maps library.
Start using the Google Elevation API
To play around with the Google Elevation API, head over to https://google-elevation-demo.afi.dev/ and enter an address or place name e.g. "Whistler, BC" in the search box at the top left. Drag the marker around the map to see the elevation anywhere on the map.
If you prefer to run the app locally:
- Fork both google_elevation_demo and google_elevation_backend repositories on GitHub.
- In google_elevation_backend, run
npm installto install the dependencies followed bynpm start. - In google_elevation_demo, run
npm installfollowed byvite run devto start the app. Open your browser to http://localhost:3000/ to view the app.
Remember to update the .env files in both folders with a Google Maps API key that has the Google Elevation API enabled.
Parting thoughts
Beyond the popular "Big Three" Maps, Routes, and Places, the Google Maps Platform offers several specialized tools and the Google Elevation API is one of them. While rarely used, it provides precise elevation data for specific locations or paths and is backed by clear documentation and easy set up. It’s a niche tool for sure, but if you ever find yourself needing to know the height of a specific location, the Elevation API has you covered.
👋 As always, if you have any questions or suggestions for me, please reach out or say hello on LinkedIn.