OSRM Route API: Free directions API with turn by turn directions and polylines
How to use the OSRM Route API to build a turn by turn navigation app.

In my last two posts in this series on Open Street Maps Routing Machine (OSRM), I explained how to set up osrm-backend on Docker and host the OSRM API as a web service on EC2. These posts were mainly about infrastructure - installing OSRM and deploying it locally or on the web.
This write up will instead focus on functionality - specifically, OSRM's Route API, a service that quickly calculates the fastest path between given coordinates in the order you provide. It's a free alternative to Google's Directions API and enables your application to offer detailed turn-by-turn navigation and visually represent routes with polylines on a map. At the end of this tutorial we'll put everything together to create a simple web based navigation app, guiding users from a given start location to their chosen destination.
Part 1: Introduction to OSRM: Setting up osrm-backend using Docker
Part 2: Hosting the OSRM API on EC2: Running osrm-backend as a web service
Part 3: OSRM Route API: Free turn by turn directions and polylines (this article)
Part 4: OSRM Table API: Free distance matrix API
As with the other tutorials on this blog, full source code for this project, osrm_nav_app, can be found on GitHub.
What is the OSRM Route API?
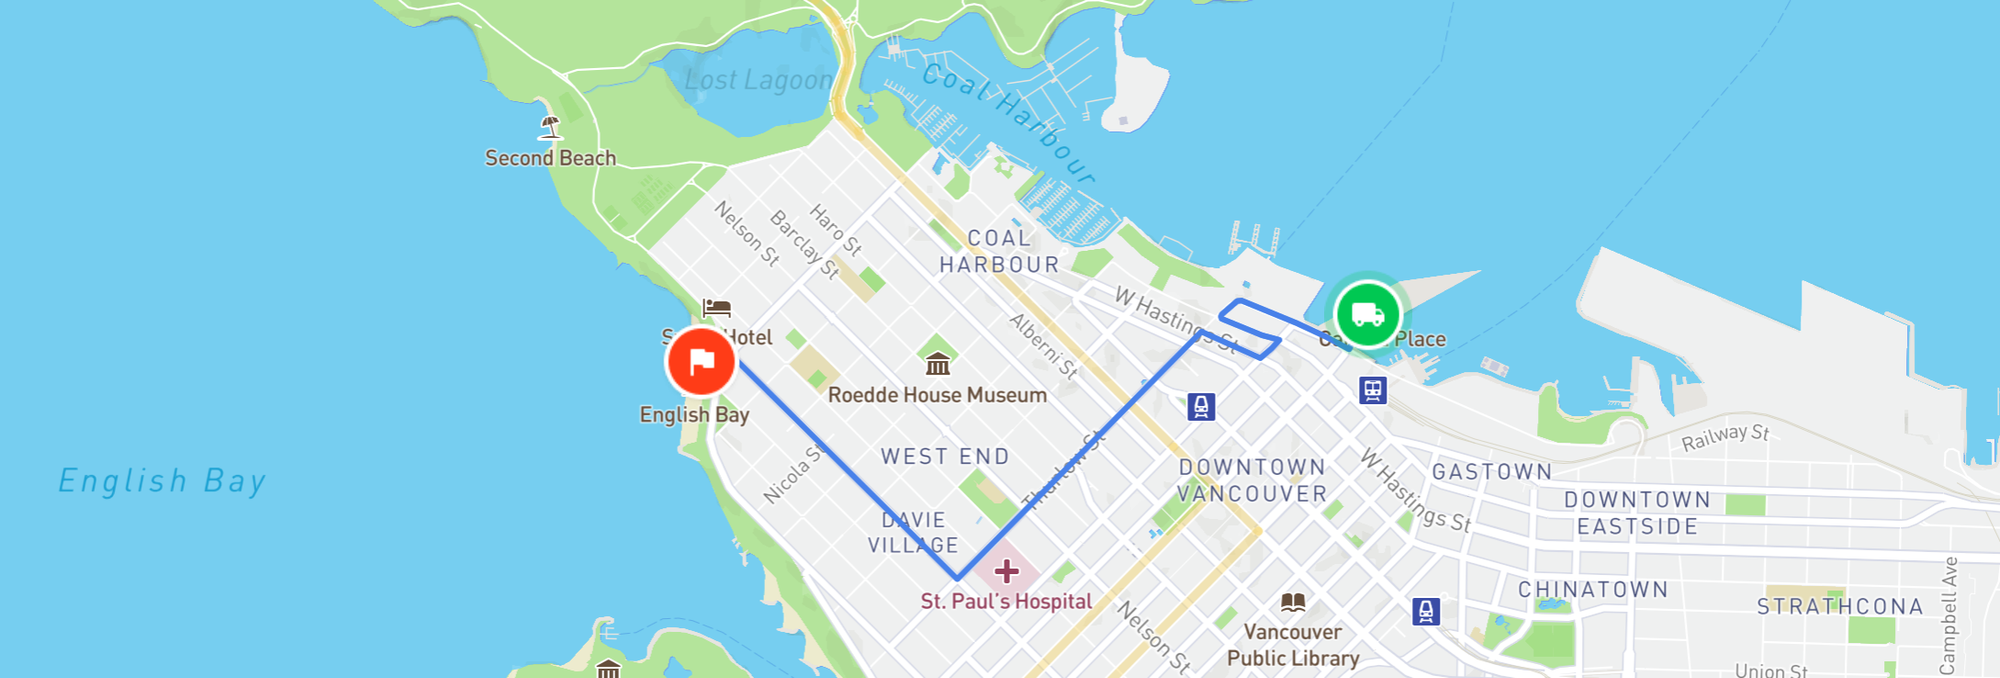
The OSRM Route API is a service that accepts an HTTP request and returns JSON formatted directions between two points. Let's suppose you just arrived at Vancouver Airport and need to get the downtown cruise terminal at Canada Place as quickly as possible to make it for your sailing. If OSRM were a person, you would ask him, "Hey OSRM! Tell me the fastest way to get from Vancouver Airport (49.195,-123.181) to Canada Place (49.290,-123.105)." OSRM would think about it for a few milliseconds and reply, "So from where you are, go straight, then after 300 m make the next right, ... and after 35 minutes you'll reach your destination. Oh and by the way, here's an encoded polyline string you can use to plot the route on a map so you know where you are going.
In the next section, we'll be using the OSRM server loaded with the map of British Columbia, Canada that we set up in last post. Take note of its URL, {osrm_server_url} because we'll need it to make API calls in the next section.
OSRM Route API example
Endpoint GET
http://{osrm_server_url}:5000/route/v1/driving/
-123.1788482,49.195113;-123.1111209,49.2888248?
overview=full&geometries=polyline&steps=true&generate_hints=false
The general structure of a Route API call is as follows:
/{service}/{version}/{profile}/{coordinates}?option=value&option=value
:5000 is the default port OSRM comes installed with.
/route/v1/driving/ instructs OSRM to call the Route Service API (ver 1) with the driving profile.
-123.1788482,49.195113;-123.1111209,49.2888248 are the GPS coordinates (in longitude, latitude format) of the stops you want to generate a route for. If you need to visit an intermediate stop e.g. if I wanted to grab dim sum in Empire Seafood in Richmond (49.178,-123.142) before heading to the cruise, I could insert the restaurant's coordinates as an additional waypoint like so: -123.1788482,49.195113;-123.1424345,49.1789707;-123.1111209,49.2888248.
overview=full lets us add overview geometry (either full, simplified) to the polyline. full gives us a polyline that tracks roads very closely, even at the highest zoom levels.
geometries=polyline returns the encoded polyline in the geometries object of the response (more on this later).
steps=true includes route steps for each leg in the route. We'll use this in the following sections to generate turn by turn directions.
Output
{
    "code": "Ok",
    "routes": [
        {
            "geometry": "kjgkHxiynVPHx@Vf@hDDNFJFJHFHDJB~AZL@dAR`@CRYt@yAXaAHo@RuBD_AT{CFkAHoA@WNgCBWDy@Bm@B_@Bc@?c@?a@Ai@Ee@WaDCYAEEi@KmAa@qE]eE[oDGs@Gs@E}@Eu@Cw@Cw@E}A?mA?IA[@kBD{g@?aF@qG?{@?wA?sD?kAAgAAiACiACkACgACeAEeAEaAGcAG_AGaAKwAAUEi@Ee@IgAe@cE_AoIsAoL]gDmB}P]iDGq@O}AGe@Gc@Ga@Ia@I_@I_@Mc@I]M]M]M]O[OYQYQYKOcAsA}@q@s@c@m@Wi@OkBk@eD_AuIkCKSiBy@u@[yBy@SEUAS?S@UDSFSHQJSNSPQTOTOXMZKZeAxD{AxFs@vCO`@{@jDSr@Wt@Wn@QVORSLSHID]DQLaFEO?MAOM_BI_DEW?SAeCCaB@MLG?iBCM?M?{@C}AAsDEqDEuBCu@AyDKQ?kDCuDIoB?SAwDGU?kDEmBEaDEQ?uDEsDGuDGoBC_CEcLO[?yDImDC{DGuDEsJKaG?yAAW?W?yDKsDGeDC}DG{DE_EG{DIcEE{DEcDEoHGu@AsEGwDGwDCgEEa@AgCCaCEeCCqACsFGyGIY?oIMY?U?_BC{DEuDEwDGc@A_CCY?S?OAuCEwDGmCCk@?MAmDGgDGoACwAA_@MeACg@AsCEsAC_@Ce@C[E[K_@O]OWQUO]YGUQQKMMQKMy@uAmUia@ESg@{@Yg@M]EOGYG[o@uDk@_EKg@Ok@MYw@sA_AcBCEGMMQwD_HMUIMcAiBoAwBi@y@IOIOaAeByB{DIOIO}AiCaBqCIKKSAAyD{GIMMSyBqDkAwBQWOY}B_EQ[u@qAIMGKCEgCgE{@yAq@mAKOcAiBaA_BcAgBQZS\\wAfCGJU`@cBzCeA}Ae@s@??AA?????AA????AA???A??A??A????AA?????A??AA?????A?????AA??A?????A???A?????A?????A???A?????A???A??@??A?????A???A@????C[GMCC{@g@",
            "legs": [
                {
                    "steps": [
                        {
                            "geometry": "kjgkHxiynVPHx@V",
                            "maneuver": {
                                "bearing_after": 199,
                                "bearing_before": 0,
                                "location": [
                                    -123.17869,
                                    49.194776
                                ],
                                "modifier": "straight",
                                "type": "depart"
                            },
                            "mode": "driving",
                            "driving_side": "right",
                            "name": "",
                            "intersections": [
                                {
                                    "classes": [
                                        "tunnel"
                                    ],
                                    "out": 0,
                                    "entry": [
                                        true
                                    ],
                                    "bearings": [
                                        199
                                    ],
                                    "location": [
                                        -123.17869,
                                        49.194776
                                    ]
                                },
                                {
                                    "out": 1,
                                    "in": 0,
                                    "entry": [
                                        false,
                                        true
                                    ],
                                    "bearings": [
                                        15,
                                        195
                                    ],
                                    "location": [
                                        -123.178737,
                                        49.194688
                                    ]
                                }
                            ],
                            "weight": 10.6,
                            "duration": 10.6,
                            "distance": 43.3
                        },
                        ... 11 more step objects
                    ],
                    "summary": "Grant McConachie Way, Granville Street",
                    "weight": 1456.1,
                    "duration": 1456.1,
                    "distance": 14899.7
                }
            ],
            "weight_name": "routability",
            "weight": 1456.1,
            "duration": 1456.1,
            "distance": 14899.7
        }
    ],
    "waypoints": [
        {
            "distance": 39.209515718,
            "name": "",
            "location": [
                -123.17869,
                49.194776
            ]
        },
        {
            "distance": 163.535250862,
            "name": "",
            "location": [
                -123.112656,
                49.287751
            ]
        }
    ]
}
Drawing the OSRM route polyline on a map
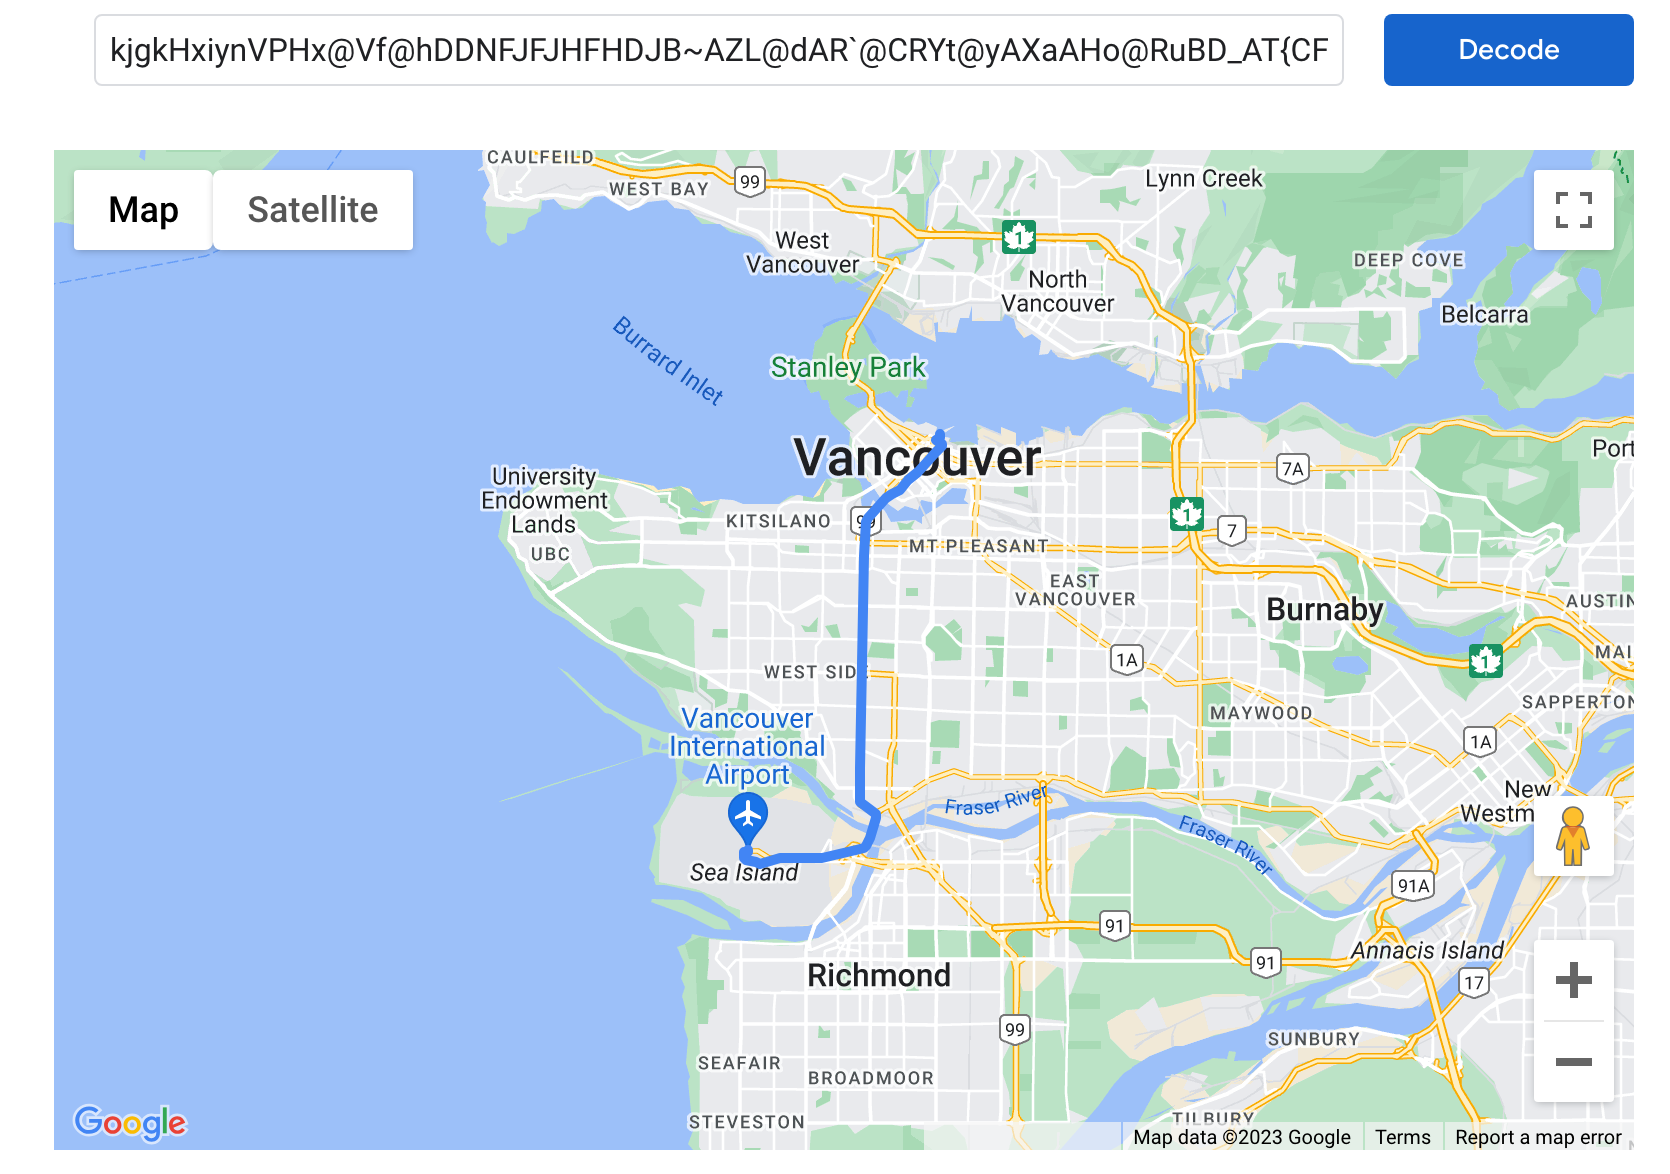
In the geometry object of the routes array in the response, we can find the route polyline:
kjgkHxiynVPHx@Vf@hDDNFJFJHFHDJB~AZL@dAR`@CRYt@yAXaAHo@RuBD_AT{CFkAHoA@WNgCBWDy@Bm@B_@Bc@?c@?a@Ai@Ee@WaDCYAEEi@KmAa@qE]eE[oDGs@Gs@E}@Eu@Cw@Cw@E}A?mA?IA[@kBD{g@?aF@qG?{@?wA?sD?kAAgAAiACiACkACgACeAEeAEaAGcAG_AGaAKwAAUEi@Ee@IgAe@cE_AoIsAoL]gDmB}P]iDGq@O}AGe@Gc@Ga@Ia@I_@I_@Mc@I]M]M]M]O[OYQYQYKOcAsA}@q@s@c@m@Wi@OkBk@eD_AuIkCKSiBy@u@[yBy@SEUAS?S@UDSFSHQJSNSPQTOTOXMZKZeAxD{AxFs@vCO`@{@jDSr@Wt@Wn@QVORSLSHID]DQLaFEO?MAOM_BI_DEW?SAeCCaB@MLG?iBCM?M?{@C}AAsDEqDEuBCu@AyDKQ?kDCuDIoB?SAwDGU?kDEmBEaDEQ?uDEsDGuDGoBC_CEcLO[?yDImDC{DGuDEsJKaG?yAAW?W?yDKsDGeDC}DG{DE_EG{DIcEE{DEcDEoHGu@AsEGwDGwDCgEEa@AgCCaCEeCCqACsFGyGIY?oIMY?U?_BC{DEuDEwDGc@A_CCY?S?OAuCEwDGmCCk@?MAmDGgDGoACwAA_@MeACg@AsCEsAC_@Ce@C[E[K_@O]OWQUO]YGUQQKMMQKMy@uAmUia@ESg@{@Yg@M]EOGYG[o@uDk@_EKg@Ok@MYw@sA_AcBCEGMMQwD_HMUIMcAiBoAwBi@y@IOIOaAeByB{DIOIO}AiCaBqCIKKSAAyD{GIMMSyBqDkAwBQWOY}B_EQ[u@qAIMGKCEgCgE{@yAq@mAKOcAiBaA_BcAgBQZS\\wAfCGJU`@cBzCeA}Ae@s@??AA?????AA????AA???A??A??A????AA?????A??AA?????A?????AA??A?????A???A?????A?????A???A?????A???A??@??A?????A???A@????C[GMCC{@g@Luckily for us, OSRM uses a well known polyline encoding/decoding scheme used by both Google Maps and Mapbox, so you can use the @mapbox/polyline library with precision level 5 to decode it.
var polyline = require('@mapbox/polyline');

// returns an array of lat, lon pairs
polyline.decode('kjgkHxiynVPHx@Vf... rest of str', 5);

// -> '[[ 49.19478, -123.17869 ], [ 49.19469, -123.17874 ] ... 379 more items]'
You can even use the oh so convenient Polyline Decoder Utility from Google to draw the decoded route string on a map.
Turn by turn navigation with OSRM
Turn by turn navigation is available in the response of the Route API if you include the steps=true parameter in your API call. Let's give it a try using the public OSRM Route API endpoint:
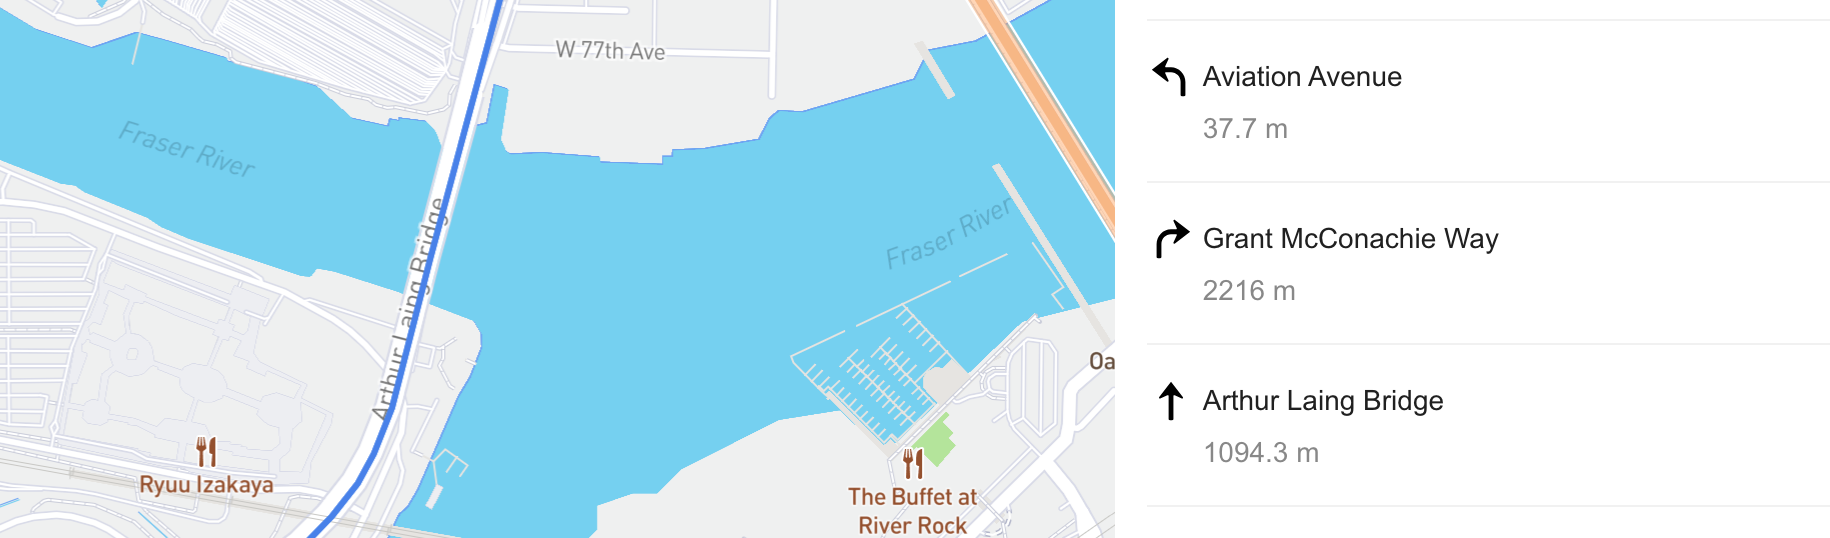
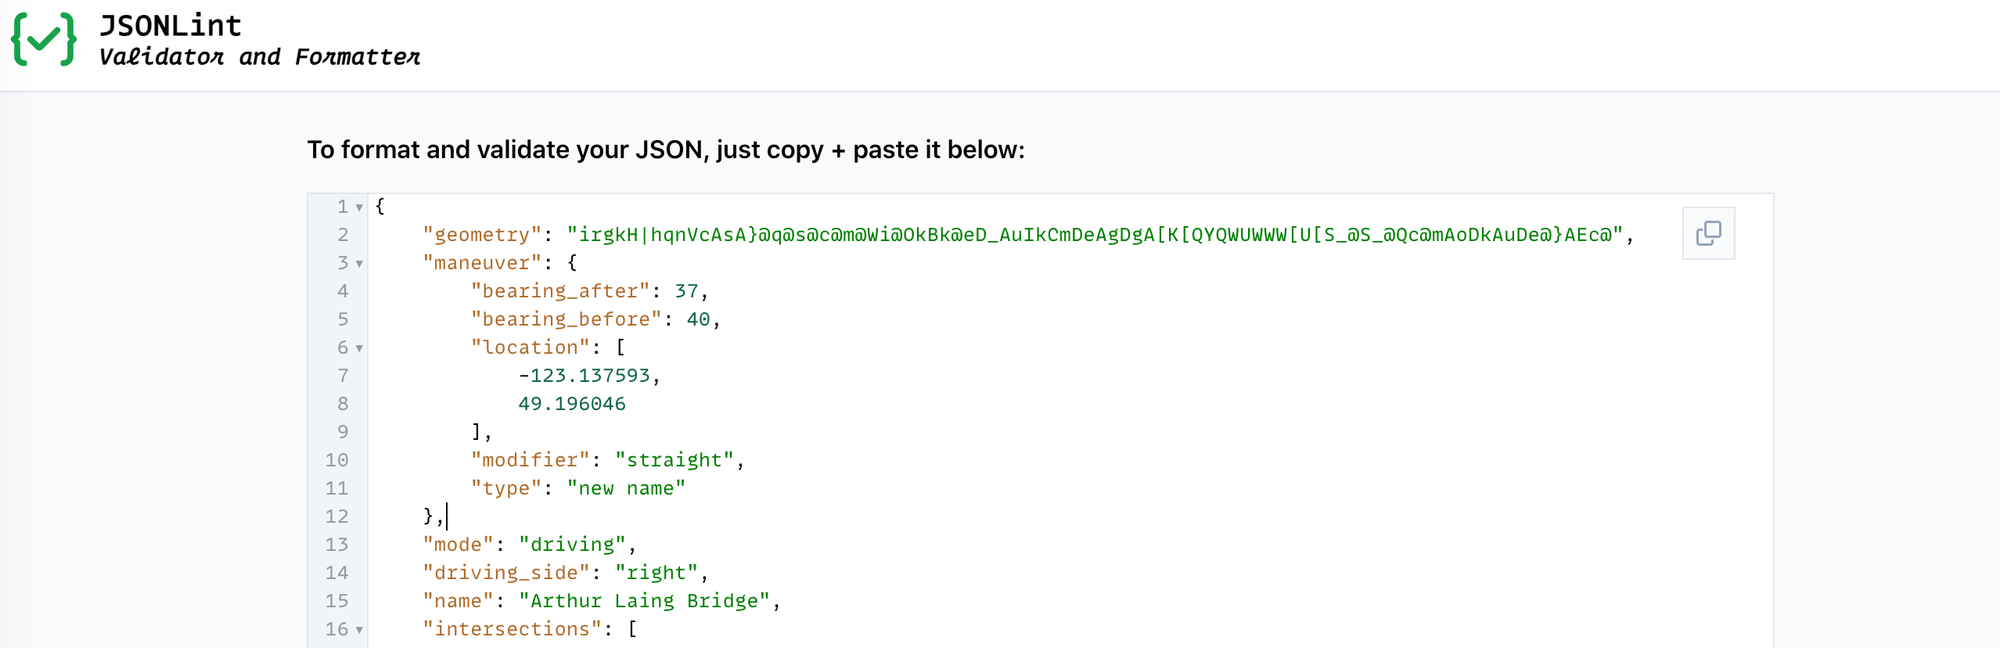
To make our turn by turn directions absolutely clear, we are going to use this format: ${maneuver} ${road_name} ${distance} so something like STRAIGHT Arthur Laing Bridge 1094.3m means that you go straight on Arthur Laing Bridge and continue for 1094.3 meters.
Endpoint GET
Output (partial)
Zooming in on the steps object, we see:
{
    "geometry": "irgkH|hqnVcAsA}@q@s@c@m@Wi@OkBk@eD_AuIkCmDeAgDgA[K[QYQWUWWW[U[S_@S_@Qc@mAoDkAuDe@}AEc@",
    "maneuver": {
        "bearing_after": 37,
        "bearing_before": 40,
        "location": [
            -123.137593,
            49.196046
        ],
        "modifier": "straight",
        "type": "new name"
    },
    "mode": "driving",
    "driving_side": "right",
    "name": "Arthur Laing Bridge",
    "intersections": [
        {
            "out": 0,
            "in": 1,
            "entry": [
                true,
                false
            ],
            "bearings": [
                45,
                225
            ],
            "location": [
                -123.137593,
                49.196046
            ]
        },
        {
            "out": 0,
            "in": 2,
            "entry": [
                true,
                true,
                false
            ],
            "bearings": [
                15,
                45,
                195
            ],
            "location": [
                -123.135298,
                49.200476
            ]
        }
    ],
    "weight": 83,
    "duration": 83,
    "distance": 1094.3
}
The best way to make sense of the API response is to copy the output and paste it into a JSON prettifier like JSONLint.
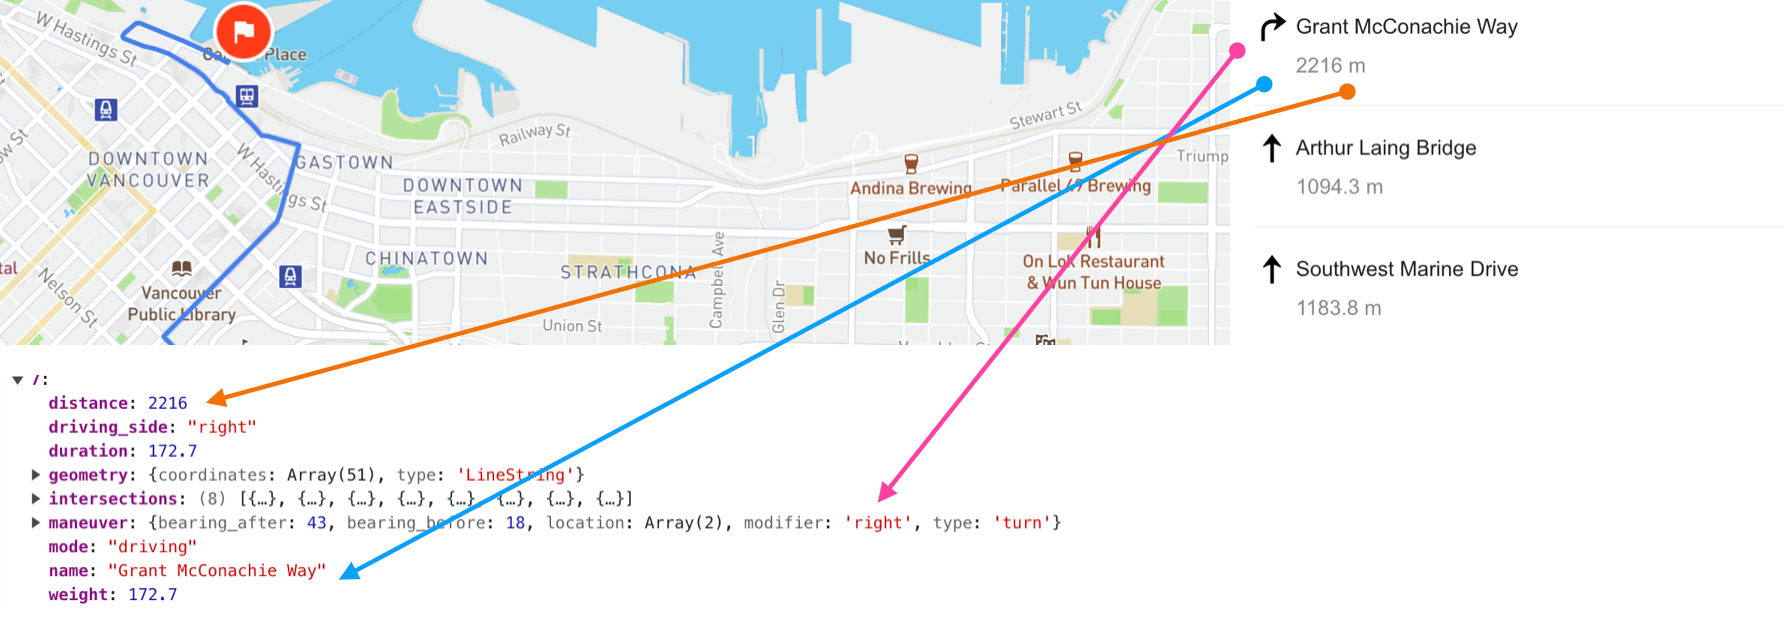
maneuver.modifier is your maneuver, one of STRAIGHT, LEFT, RIGHT, SLIGHT LEFT and SLIGHT RIGHT.
name is the name of the road you are executing the maneuver on e.g. LEFT Grant McConachie Way means "turn left on Grant McConachie Way".
distance is how the driving distance until the next maneuver e.g. LEFT Grant McConachie Way 2216m means "after you turn left on Grant McConachie Way, continue driving for 2216 meters".
Building a turn by turn navigation app with OSRM
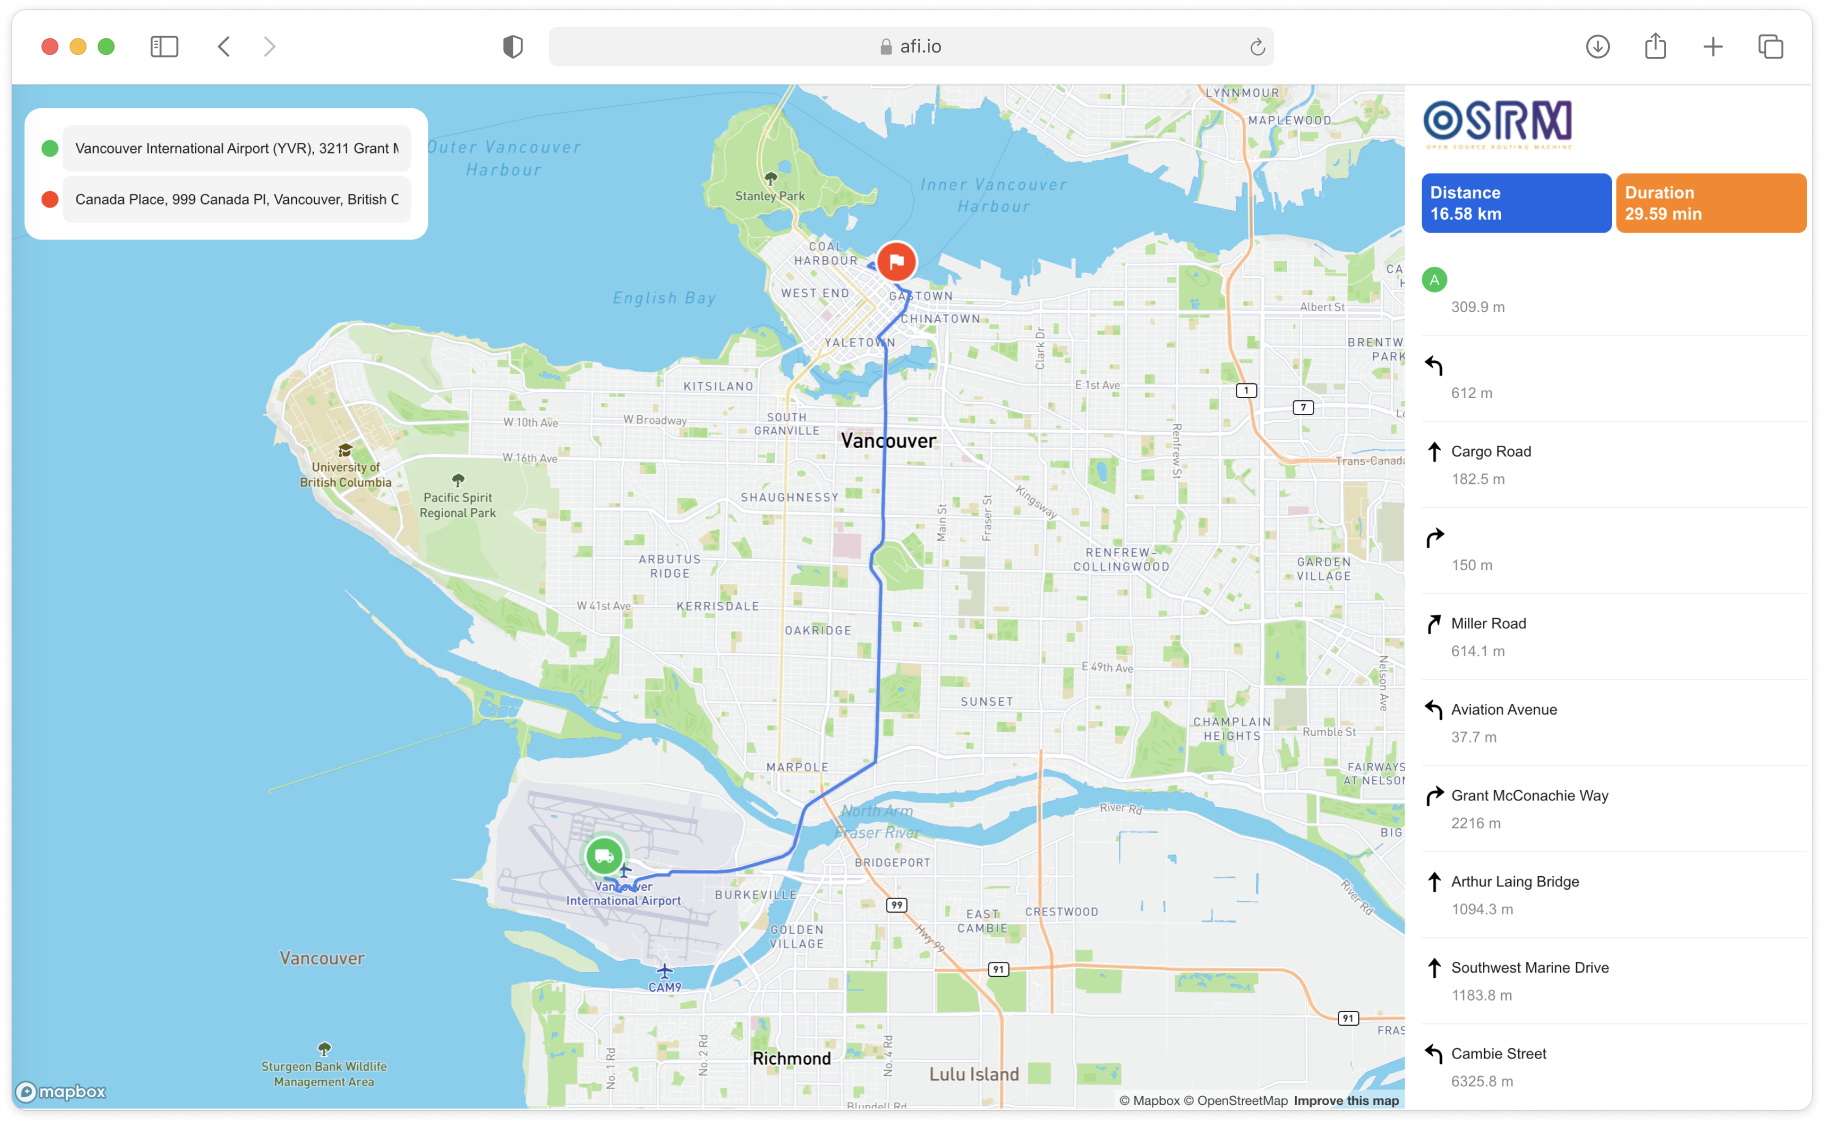
Now that we know how to draw polylines and retrieve turn by turn directions from the Route API, the next step is to develop a web-based navigation app that provides turn-by-turn guidance (screenshot below).
osrm-nav-app is a simple React app scaffolded with the Create React App build kit. It takes inspiration from OSRM's official demo app. To run it locally, clone the repo and run npm install followed by npm start. You'll also need to create a .env file with the line REACT_APP_MAPBOX_ACCESS_TOKEN={MAPBOX_ACCESS_TOKEN} added, where {MAPBOX_ACCESS_TOKEN} is the Mapbox API key provisioned with your Mapbox account. We'll be using Mapbox for the address autocomplete and map tiles.
The navigation app consists of three primary components:
- Address autocomplete and geocoding: Located in the top left corner, this feature allows for the input of start and end locations. It uses the Mapbox Places API to suggest addresses as you type and to convert these addresses into geographic coordinates.
- Interactive map interface: This central feature, also powered by Mapbox, displays the map. It shows the starting location marked with a green truck icon, the destination indicated by a red flag icon, and the planned route represented as a polyline.
- Directions table: On the right-hand side, there is a table that provides detailed turn-by-turn directions. This section also includes the total distance of the trip and the estimated travel time, all of which are sourced from the Route API.
Address autocomplete and geocoding
The code for the origin and destination text input boxes can be found in App.js in the render() method (or more accurately, in the return statement of App.js).

Near the top of the App.js's return statement you can find the address-box div:
<div className="address-box">{renderAddressBox()}</div>which in turn contains the renderAddressBox() method. This displays the address input boxes like so:
/* App.jsx */
const renderAddressBox = () => (
  <>
    <div className="address-controls">
      <div className="address-control">
        <span className="origin-circle"></span>
        <AutoCompleteInput
          setAddress={setOriginAddress}
          onManualInputChange={handleManualOriginAddressInputChange}
          placeName={originAddress.placeName}
          placeholder="Origin address"
        />
      </div>
      <div className="address-control">
        <span className="destination-circle"></span>
        <AutoCompleteInput
          setAddress={setDesitinationAddress}
          onManualInputChange={handleManualDestinationAddressInputChange}
          placeName={destinationAddress.placeName}
          placeholder="Destination address"
        />
      </div>
    </div>
  </>
);
All of the query logic resides in the <AutoCompleteInput/> component itself, which fires off the handleChange() method when the user starts typing.
/* /components/AddressInput/index.jsx */
return (
    <div className="address-input-container">
      {/* Input field for the address with provided props */}
      <input
        type="text"
        value={placeName}
        onChange={handleChange}
        {...others}
      />

      {/* List to display address suggestions */}
      <ul className="address-suggestions">
        {/* Map through suggestions and render each as a list item */}
        {suggestions?.map((suggestion, index) => (
          <li key={index} onClick={() => handleSelectSuggestion(suggestion)}>
            {/* Display the place name from the suggestion */}
            {suggestion.place_name}
          </li>
        ))}
      </ul>
    </div>
  );
When a user starts typing in his start address in the <AutoCompleteInput/> text box, the handleChange() event handler is called.
/* /components/AddressInput/index.jsx */
const handleChange = (event) => {
  onManualInputChange(event, "placeName");
  queryPlaces(event.target.value);
};
Inside the handleChange() method, queryPlaces() sends the event.target.value string to the Mapbox Places API.

queryPlace() uses the well known async/await design pattern to make an asynchronous request to Mapbox Places (read the full docs here).
/* /api/getPlaces.js */
export default async function getPlaces(query) {
  try {
    const response = await fetch(
      `https://api.mapbox.com/geocoding/v5/mapbox.places/${query}.json?access_token=${process.env.REACT_APP_MAPBOX_TOKEN}`,
    );

    return response.json();
  } catch (error) {
    console.error("There was an error while fetching places:", error);
  }
}
For example, the string "Canada Place" used in the examples above is used to retrieve matching addresses with this GET call to Mapbox Places (replace {MAPBOX_ACCES_TOKEN} with your Mapbox API key):
https://api.mapbox.com/geocoding/v5/mapbox.places/Canada%20Place.json?access_token={MAPBOX_ACCESS_TOKEN}
The Places API provides an array of potential addresses, known as place_names, which are then shown in the address-suggestions div. If a user selects one of these addresses, the chosen place_name along with its coordinates are stored using the setAddress() method. These coordinates will be utilized later to fetch the route solution from OSRM's Route API.
Interactive map interface
I've decided to go with Mapbox for the map layer used in this project but rather than go with its standard Javascript API, Mapbox GL JS, I've chosen to use the third party react-map-gl wrapper so that I can easily inject data and style our map using Marker, Source and Layer components like this:
<Map>
  <Marker/><Marker/>
  <Source>
    <Layer/>
  </Source>
</Map>
Displaying the start (green truck icon) and end (red flag icon) markers is easy with react-map-gl.
First, we check if either originAddress.latitude or destinationAddress.latitude variables are not null. This is a lazy (but effective!) way of checking if either an origin or destination address has been saved to the app.
/* App.js */
{
  originAddress.latitude && (
    <Marker
      longitude={originAddress.longitude}
      latitude={originAddress.latitude}
    >
      <img alt="Origin Marker" src={OriginMarker} style={{ width: 48 }} />
    </Marker>
  );
}
{
  destinationAddress.latitude && (
    <Marker
      longitude={destinationAddress.longitude}
      latitude={destinationAddress.latitude}
    >
      <img
        alt="Destination Marker"
        src={DestinationMarker}
        style={{ width: 48 }}
      />
    </Marker>
  );
}
If so, we inject a <Marker/> component into <Map/> and place it at the latitude and longitude returned from the Mapbox Places API in the previous section. The marker is styled with width:48 and represented by the origin_marker.png and destination_marker.png files stored in the /assets/images folder.
Similarly, the route polyline is added to the map with the line:
{polylineCoodinates && <Polyline coordinates={polylineCoodinates} />}Within the <Polyline/> component, we make use of react-map-gl's <Source><Layer/></Source> structure to add a <Layer/> of type: "line" and a type="geojson" <Source/> injected with data from the coordinates field via coordinates={polylineCoodinates} above.
/* /components/Polyline.jsx */
const sourceData = {
  type: "Feature",
  properties: {},
  geometry: {
    type: "LineString",
    coordinates,
  },
};

// ... Additional code not related to polyline data source

return (
  <Source type="geojson" data={sourceData}>
    <Layer {...layerProps} />
  </Source>
);
One last thing - how did we receive the polyLineCoordinates? This came from the useEffect() hook whenever the origin or destination address changes.
/* App.js */
useEffect(() => {
  const getDirectionFunc = async () => {
    const res = await getDirection(originAddress, destinationAddress);
    const firstRoute = res.routes[0];
    const polylineCoodinatesTmp = _flatten(
      firstRoute?.legs[0]?.steps.map((step) => step.geometry.coordinates),
    );
    setRoute(firstRoute);
    setPolylineCoordinates(polylineCoodinatesTmp);
  };

  if (!originAddress.latitude || !destinationAddress.latitude) return;

  getDirectionFunc();

  // eslint-disable-next-line react-hooks/exhaustive-deps
}, [originAddress.latitude, destinationAddress.latitude]);
Directions table
The final element of our navigation application is the directions table. This table provides a detailed list of turn-by-turn directions, guiding users from the beginning to the end of the route.
The first thing we do is extract the steps array from the Route API response.
const steps = route?.legs[0]?.steps || [];This gives us a Javascript object that looks something like this:

Together with the maneuver object within each step object in the steps array, we can extract everything needed to build the directions table - step.name, step.maneuver.modifier and step.distance.
The code that does this is located in the renderDirectionDetail() method of App.js.
/* App.js */
{
  steps?.map((step, idx) => {
    if (idx === 0 || idx === steps.length - 1) return null;
    return (
      <div
        className="item"
        onClick={() => setMapCenter(step.maneuver.location)}
      >
        <div className="step-name">
          <img
            width={24}
            alt="Step icon"
            src={DIRECTION_ARROWS[step.maneuver.modifier]}
          />
          <span>{step.name}</span>
        </div>
        <span>{step.distance} m</span>
      </div>
    );
  });
}
Wrap up and next steps
This concludes our tutorial on the OSRM Route API. We covered the basics of making API requests to it and used waypoints and polyline data included in its response to build a simple navigation app with turn by turn directions. In an upcoming post, we will explore the OSRM Table API, a useful free alternative to Google Map's Directions Service.
👋 As always, if you have any questions or suggestions for me, please reach out or say hello on LinkedIn.