How to use Shopify Draggable with React
Refactoring Shopify Draggable code for use in a React web application.

In my last post, I explained how to use the @shopify/draggable javascript library to build an interactive drag and drop timeline. In this one, I'll build on what we did in the previous post and show you how to refactor our code for use in a React web application.
Part 1: Using Shopify Draggable to build a drag and drop timeline
Part 2: How to use Shopify Draggable with React (this article)
Part 3: Styling a Shopify Draggable React component with CSS
Here's what the interactive drag and drop timeline you'll get at the end of this tutorial looks like:

As with all our tutorials, you can find working sample code for the full project on Github.
React, built and maintained by Facebook, is the most popular frontend javascript framework for building user interfaces on the web. One of the biggest headaches with using Shopify Draggable was that it did not play well with React. Shopify Draggable works by updating the order of HTML DOM elements on the fly. Since these updates are not communicated to React, re renders cause the state of the Draggable elements to reset, so e.g. if you dragged a block from one spot to another, this would trigger a component rerender and the block would be "rewound" back into place.
Afi Labs delivers custom software to meet your logistics needs. From vehicle routing, live tracking to proof of delivery, we've got you covered!
👋 Say Hello!
There are two ways to solve this problem. The first is to use wuweiweiwu/react-shopify-react (not part of the official Shopify Draggable library) which fixes this by providing a <DraggableContainer/> React component that represents the Draggable container that with draggable elements. You can initialize this component with the specific Draggable functionality (e.g. Dropable, Draggable, Sortable etc) you want and they will automatically be passed (deeply) to the Draggable children via React Context. The second (which this writeup is based on), is to initialize a separate <SortableList/> component with functionality for sorting a list of draggable elements using the "@shopify/draggable" library.
How our code is organized
We scaffolded this project using the Create React App with code that follows this default folder structure:
my-app/
  README.md
  node_modules/
  package.json
  public/
    index.html
    favicon.ico
  src/
    App.css
    App.js
    App.test.js
    SortableList.js
    index.css
    index.js
    logo.svg
The only new file is SortableList.js which we'll explain in just a second. public/index.html is the page template and src/index.js is the JavaScript entry point. It renders the <App/> component src/App.js where most of new code resides.
SortableList.js
Open src/SortableList.js and take a look inside (it's quite short).
import { Sortable } from "@shopify/draggable";

let sortable = null;

const SortableList = ({
  draggableSelector,
  indexAttribute,
  onSort,
  children,
}) => {
  const initSortable = (containerEl) => {
    if (sortable) return;

    sortable = new Sortable(containerEl, {
      draggable: draggableSelector,
    }).on("sortable:sorted", onDragSorted);
  };

  const onDragSorted = ({ data }) => {
    const { dragEvent } = data;
    const { over, source } = dragEvent;

    const overIndex = over.getAttribute(indexAttribute);
    const sourceIndex = source.getAttribute(indexAttribute);

    source.setAttribute(indexAttribute, overIndex);

    onSort(sourceIndex, overIndex);
  };

  return children({ initSortable: initSortable });
};

export default SortableList;
Here's a line by line explanation of what's going on:
import { Sortable } from "@shopify/draggable";
let sortable = null;
This imports the Sortable class from the @shopify/draggable library, which allows us to create sortable lists. For now, we initialize the sortable variable as null until it holds the instance of the Sortable class.
const SortableList = ({
	draggableSelector,
	indexAttribute,
	onSort,
	children,
}) => {
	const initSortable = (containerEl) => {
		if (sortable) return;

		sortable = new Sortable(containerEl, {
			draggable: draggableSelector,
		}).on("sortable:sorted", onDragSorted);
	};
	// Some extra code here ...
};
Next, we define the SortableList component as a function that takes an object with several props: draggableSelector, indexAttribute, onSort, and children. To understand what these are, let's take an advanced peek in App.js and see how SortableList is declared.
App.js
So this tells us that:
| prop | description |
|---|---|
| draggableSelector | Any HTML element (in our example, its |
| indexAttribute | The component prop "data-index" (used to store the order in which the element appears |
| onSort | A function that points to handleSwap() |
Back in SortableList.js, we see that the initSortable function (within the SortableList component) defined thus:
It takes as input a containerEl "container element" parameter for the sortable list and creates a new Sortable instance with the provided containerEl and sets the draggable option to the value of draggableSelector (the <li> elements we want to move around). Lastly, it registers an event listener for the "sortable:sorted" event, which calls the onDragSorted() function shown below.
const onDragSorted = ({
   data
}) => {

   console.log(data);

   const {
      dragEvent
   } = data;
   const {
      over,
      source
   } = dragEvent;

   const overIndex = over.getAttribute(indexAttribute);
   const sourceIndex = source.getAttribute(indexAttribute);

   source.setAttribute(indexAttribute, overIndex);

   onSort(sourceIndex, overIndex);
};

return children({
   initSortable: initSortable
});
};
The data object in the onDragSorted() method comes from the event object passed to the event listener when the "sortable:sorted" event is triggered. The Sortable class from the "@shopify/draggable" library emits this event when a draggable element is sorted within the list. Since this SortableEvent inherits from the shared/AbstractEvent class, it comes with a data object passed into its constructor i.e.
AbstractEvent.js
/**
   * AbstractEvent constructor.
   * @constructs AbstractEvent
   * @param {object} data - Event data
   */
  constructor(data) {
    this[canceled] = false;
    this.data = data;
  }
The rest of the code in onDragSorted() handles the swapping. It checks for the current block's index (the block you are dragging) against the index of the block you are dragging over and swaps them by calling onSort().
const {
   dragEvent
} = data;
const {
   over,
   source
} = dragEvent;

const overIndex = over.getAttribute(indexAttribute);
const sourceIndex = source.getAttribute(indexAttribute);

source.setAttribute(indexAttribute, overIndex);

onSort(sourceIndex, overIndex);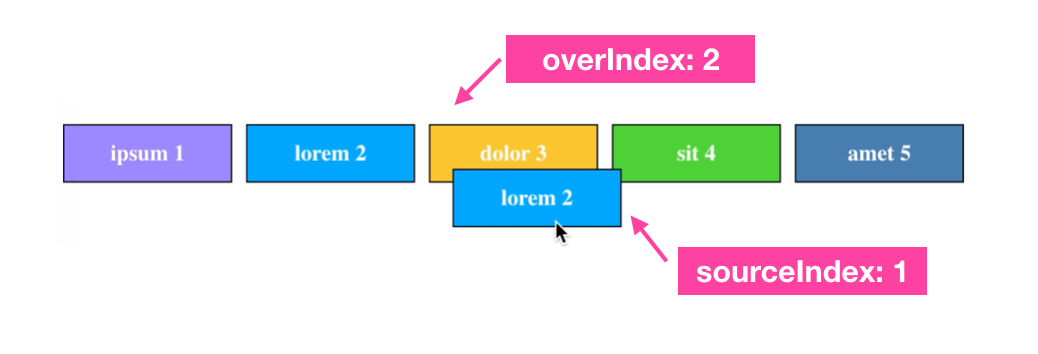
The onSort() method (originally named handleSwap()) was passed to SortableList.js from App.js. Here's what it does:
const [blocks, setBlocks] = useState(initialBlocks);

const handleSwap = (oldIndex, newIndex) => {
   [blocks[oldIndex], blocks[newIndex]] = [blocks[newIndex], blocks[oldIndex]];
   setBlocks([...blocks]);
};
It simply switches oldIndex with newIndex so blocks switch position whenever one is dragged over another (note: for this to work correctly, the blocks must physically pass over one another).
App.js
Turning over to App.js, we can see it's simply a wrapper for SortableList, which is imported right at the top with import SortableList from "./SortableList";. The initialBlocks array sets up our blocks with the original colors while the main chunk of code starting with return ( ... renders the SortableList component with the associated block colors and numbered order.
import React, {
   useState
} from "react";
import "./App.css";
import SortableList from "./SortableList";

const initialBlocks = [{
      bgColor: "#00a8ff",
      text: "lorem"
   },
   {
      bgColor: "#9c88ff",
      text: "ipsum"
   },
   {
      bgColor: "#fbc531",
      text: "dolor"
   },
   {
      bgColor: "#4cd137",
      text: "sit"
   },
   {
      bgColor: "#487eb0",
      text: "amet"
   },
];

function App() {
   const [blocks, setBlocks] = useState(initialBlocks);

   const handleSwap = (oldIndex, newIndex) => {
      [blocks[oldIndex], blocks[newIndex]] = [blocks[newIndex], blocks[oldIndex]];
      setBlocks([...blocks]);
   };

   return ( <
      div className = "container" >
      <
      ul className = "horizontal-menu sortable" >
      <
      SortableList draggableSelector = ".dragItem"
      indexAttribute = "data-index"
      onSort = {
         handleSwap
      } >
      {
         ({
            initSortable
         }) => (

            <
            div ref = {
               initSortable
            } > {
               console.log("running initSortable")
            } {
               blocks.map(({
                  bgColor,
                  text
               }, i) => ( <
                  li className = "dragItem"
                  data - index = {
                     i
                  }
                  key = {
                     text
                  }
                  style = {
                     {
                        backgroundColor: bgColor
                     }
                  } >
                  {
                     `${text} ${i + 1}`
                  } <
                  /li>
               ))
            } <
            /div>
         )
      } <
      /SortableList> <
      /ul> <
      /div>
   );
}

export default App;
To run this code, all you need to do is fork it from github and run npm install followed by npm start.
And that's a wrap! We've refactored our code and integrated our interactive drag and drop timeline we built in the previous post into a React application. In the next post, we'll add some css styling to make it look similar to the one in Parcelizer (below).

👋 As always, if you have any questions or suggestions for me, please reach out or say hello on LinkedIn.